Fright Delights · Shopify admin

Guide for Fright Delights

How to keep the store up to date yourself: change texts and pictures, add new products, events and journal posts. Every step shows where to click; just follow the red numbers.

Part 1

Texts, pictures and sections

Every text, banner, button and block of the site lives in the theme editor. On the right you see the real page, on the left you change it.

1.1

Open the theme editor

In the left menu click Online Store. Next to the Fright Delights theme click Edit theme.
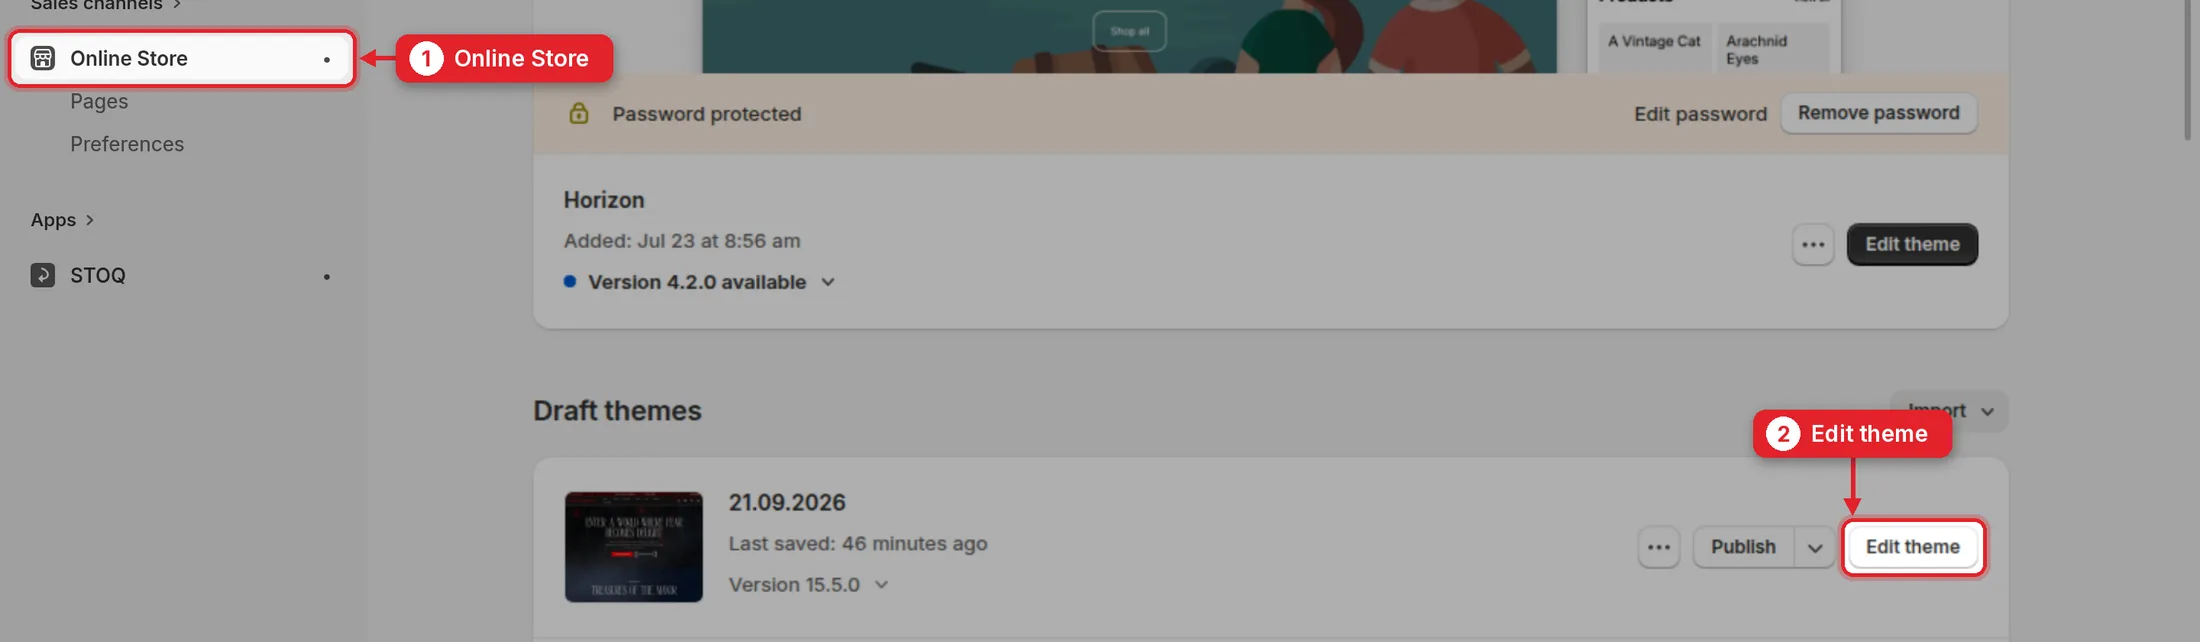
Online Store page with the Edit theme button of the Fright Delights theme highlighted
Online Store → Edit theme
1.2

Find your way around

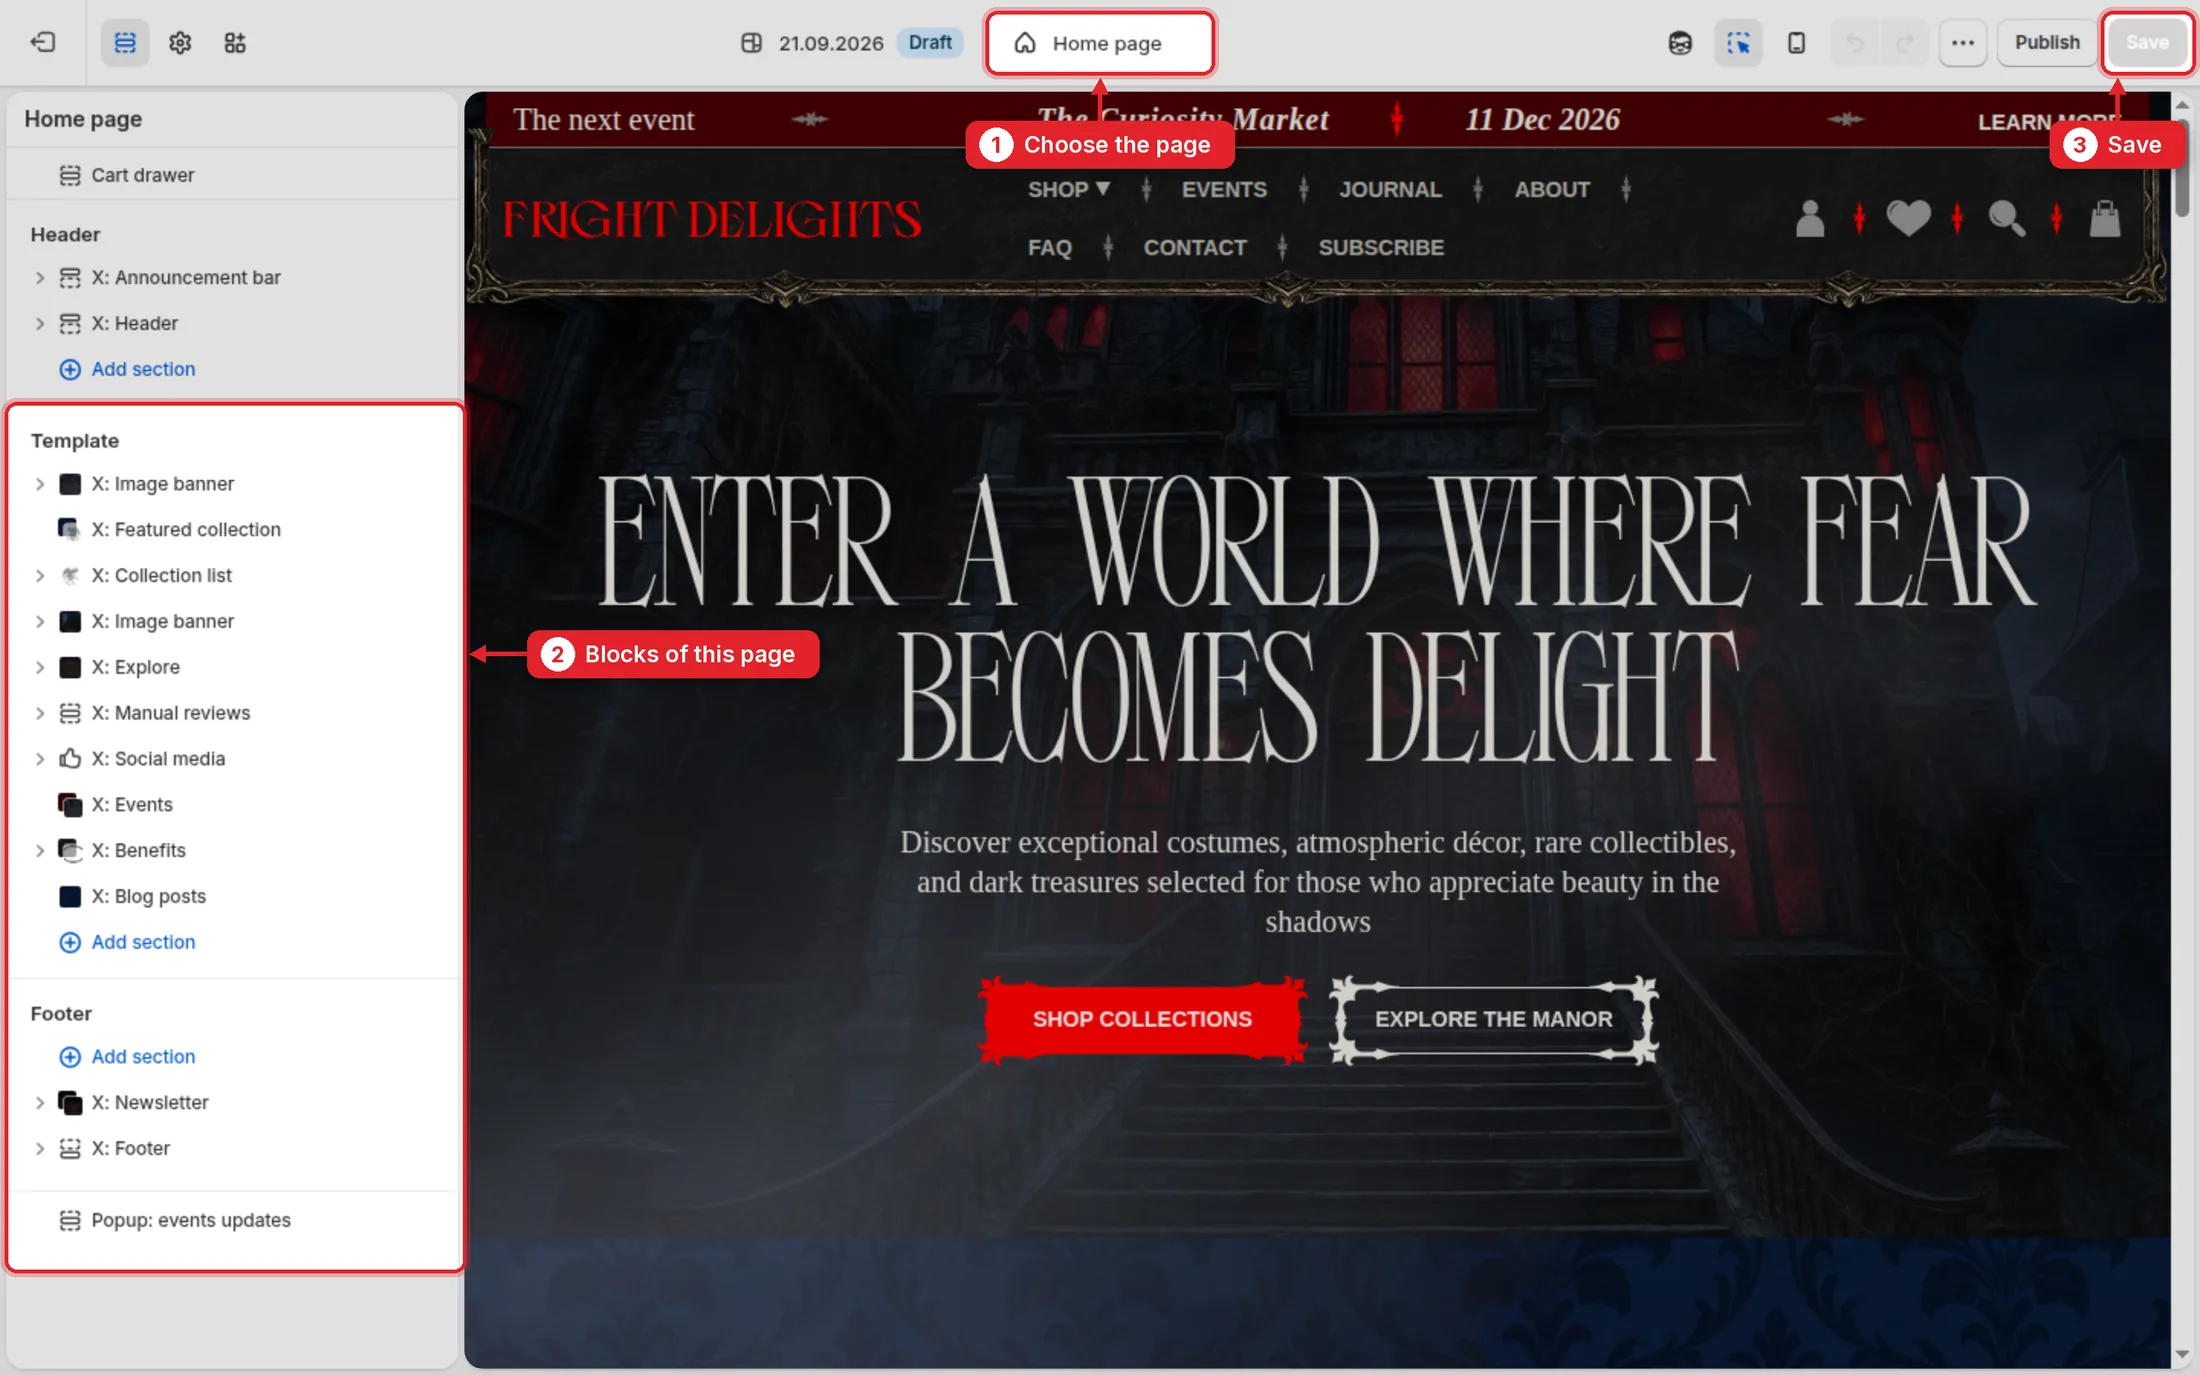
  1. 1Choose the page you want to change: home page, a product page, Events, Journal…
  2. 2All blocks of this page, in the same order as on the site. Header blocks are at the top, footer blocks at the bottom.
  3. 3Save. Your changes reach the site only after you click it. The arrows next to it undo the last steps.
Theme editor with the page selector, the list of page blocks and the Save button highlighted
1.3

Open another page

Click the page name at the top. Pages holds About us, Events & Experiences, FAQ, Contact and the other pages. Blogs is the Journal. Products and Collections are the layouts shared by all product and collection pages, so a change there applies to every one of them at once.
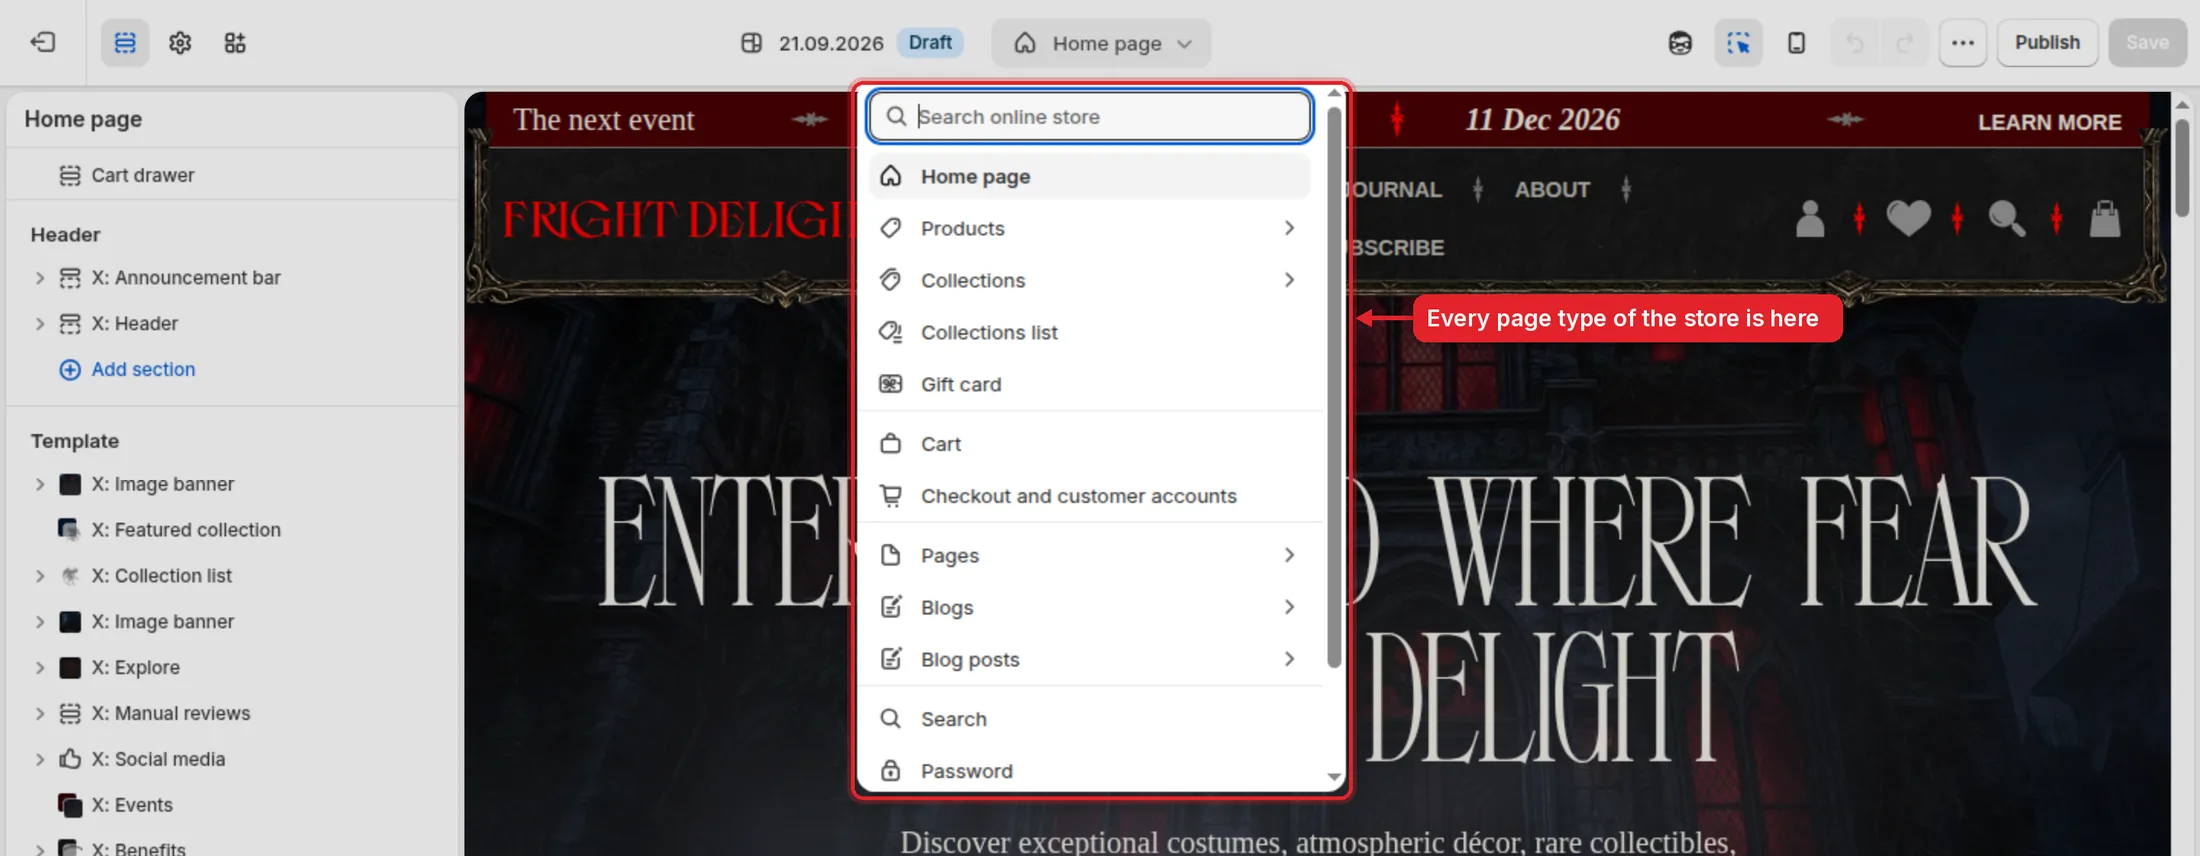
The page selector opened, listing Home page, Products, Collections, Pages, Blogs and more
1.4

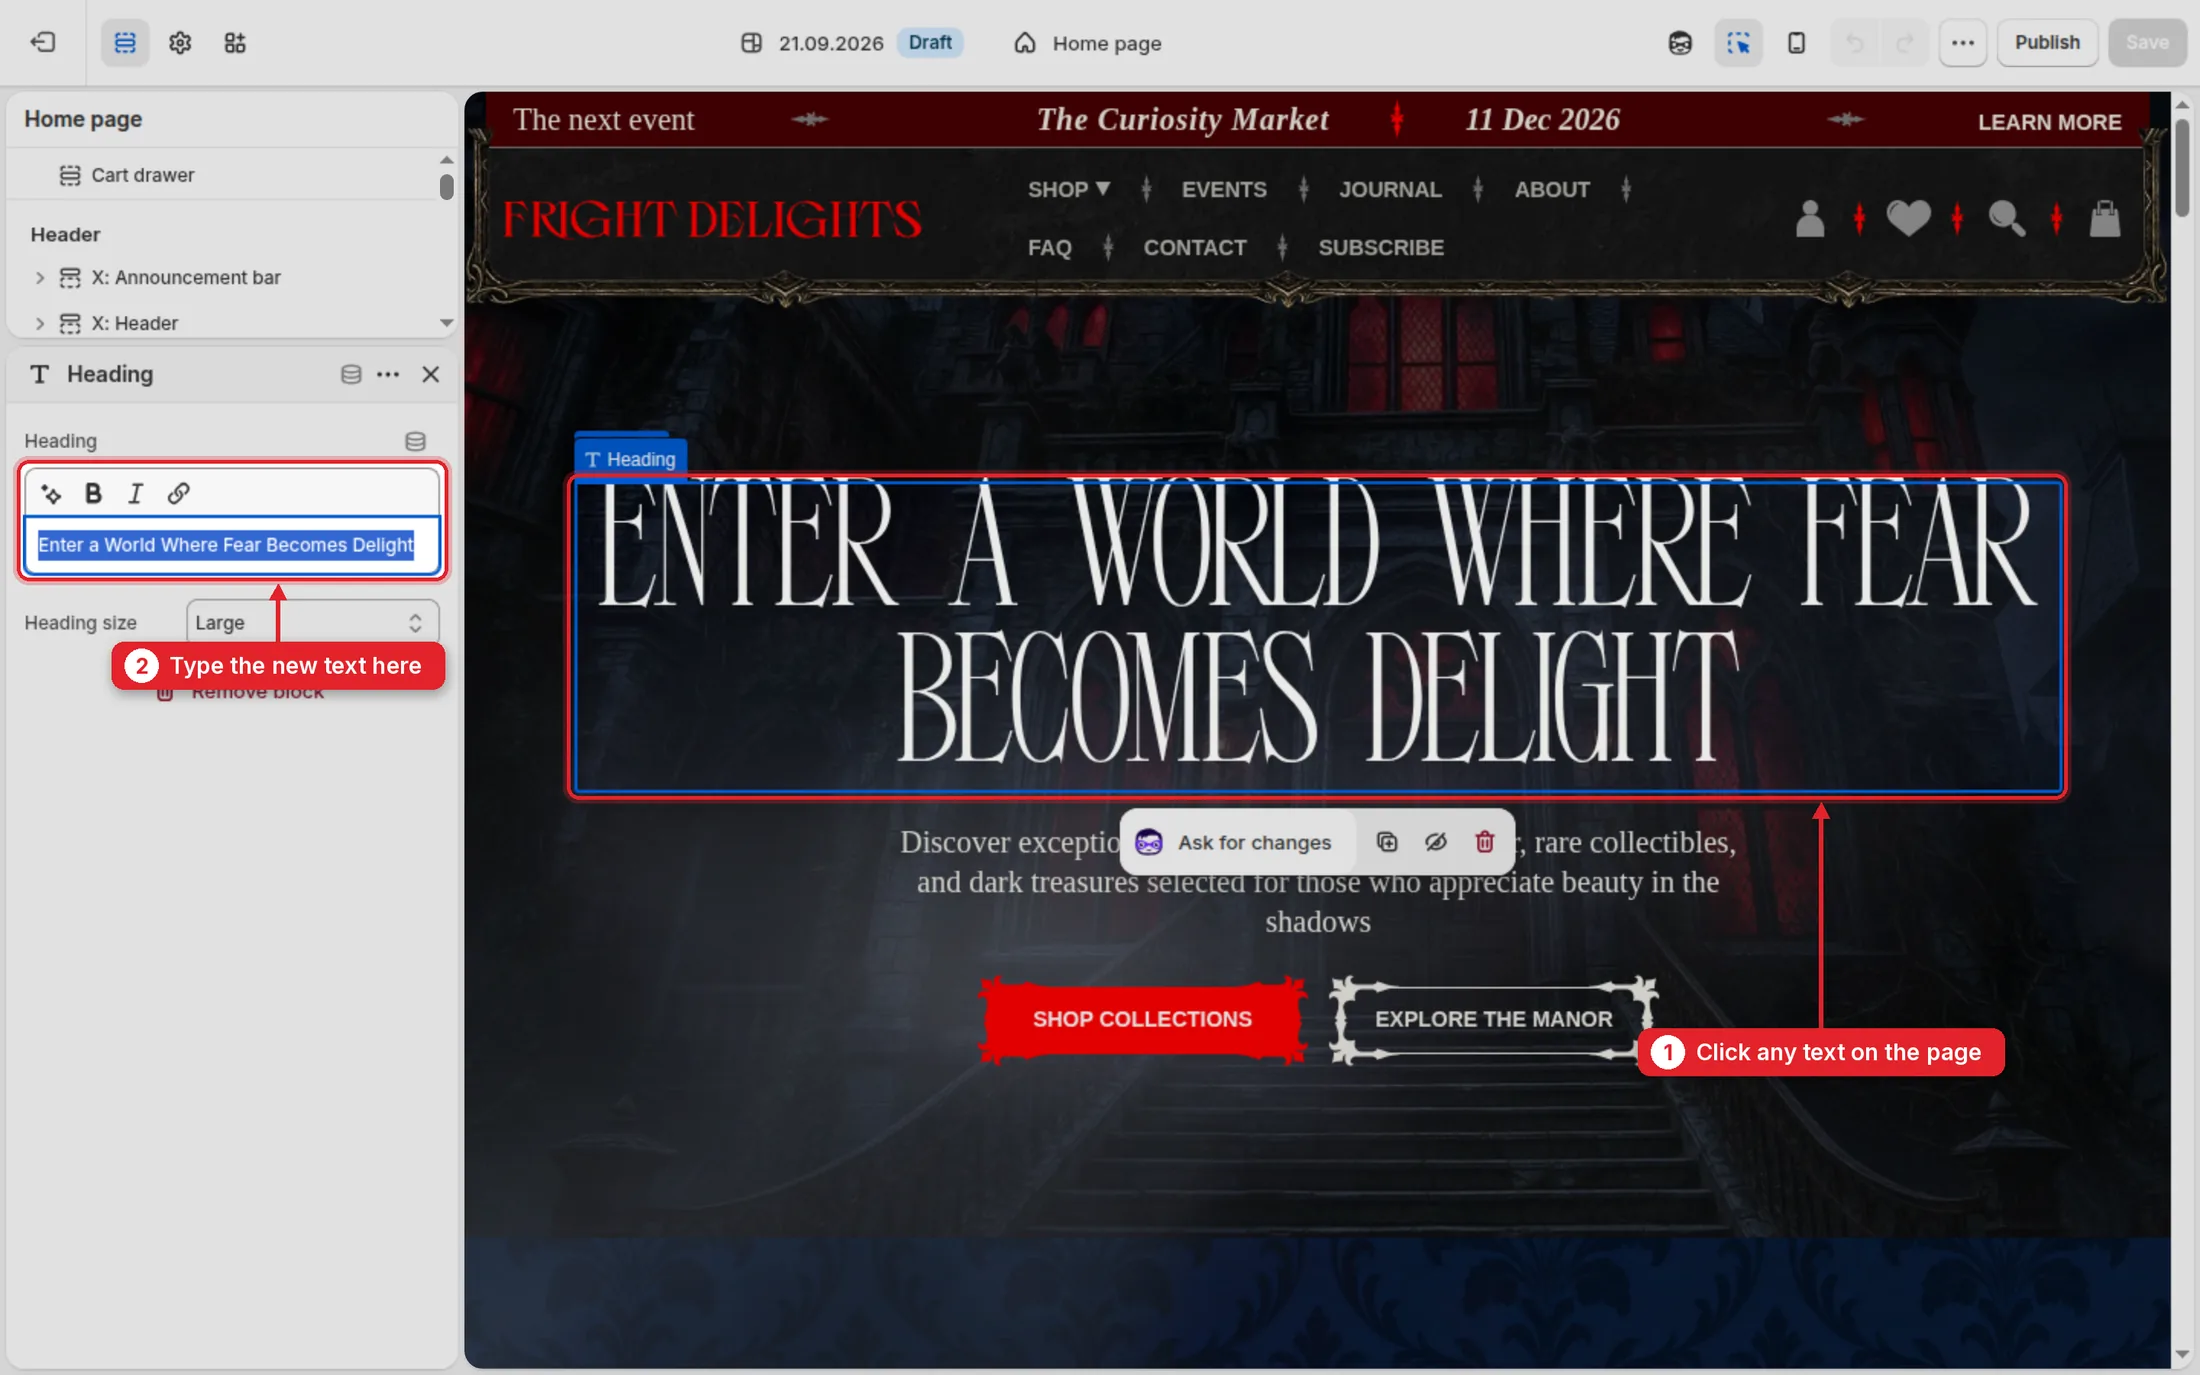
Change a text

  1. 1Click the text right on the page.
  2. 2Its field opens on the left. Type the new text there; bold, italic and links are in the small toolbar above it.
The hero heading selected on the page and its text field on the left
1.5

Change a picture

Click the block with the picture. On the left, click the image and then Change: upload a new file or pick one you uploaded before. For wide banners use large horizontal photos, 2000 px wide or more.
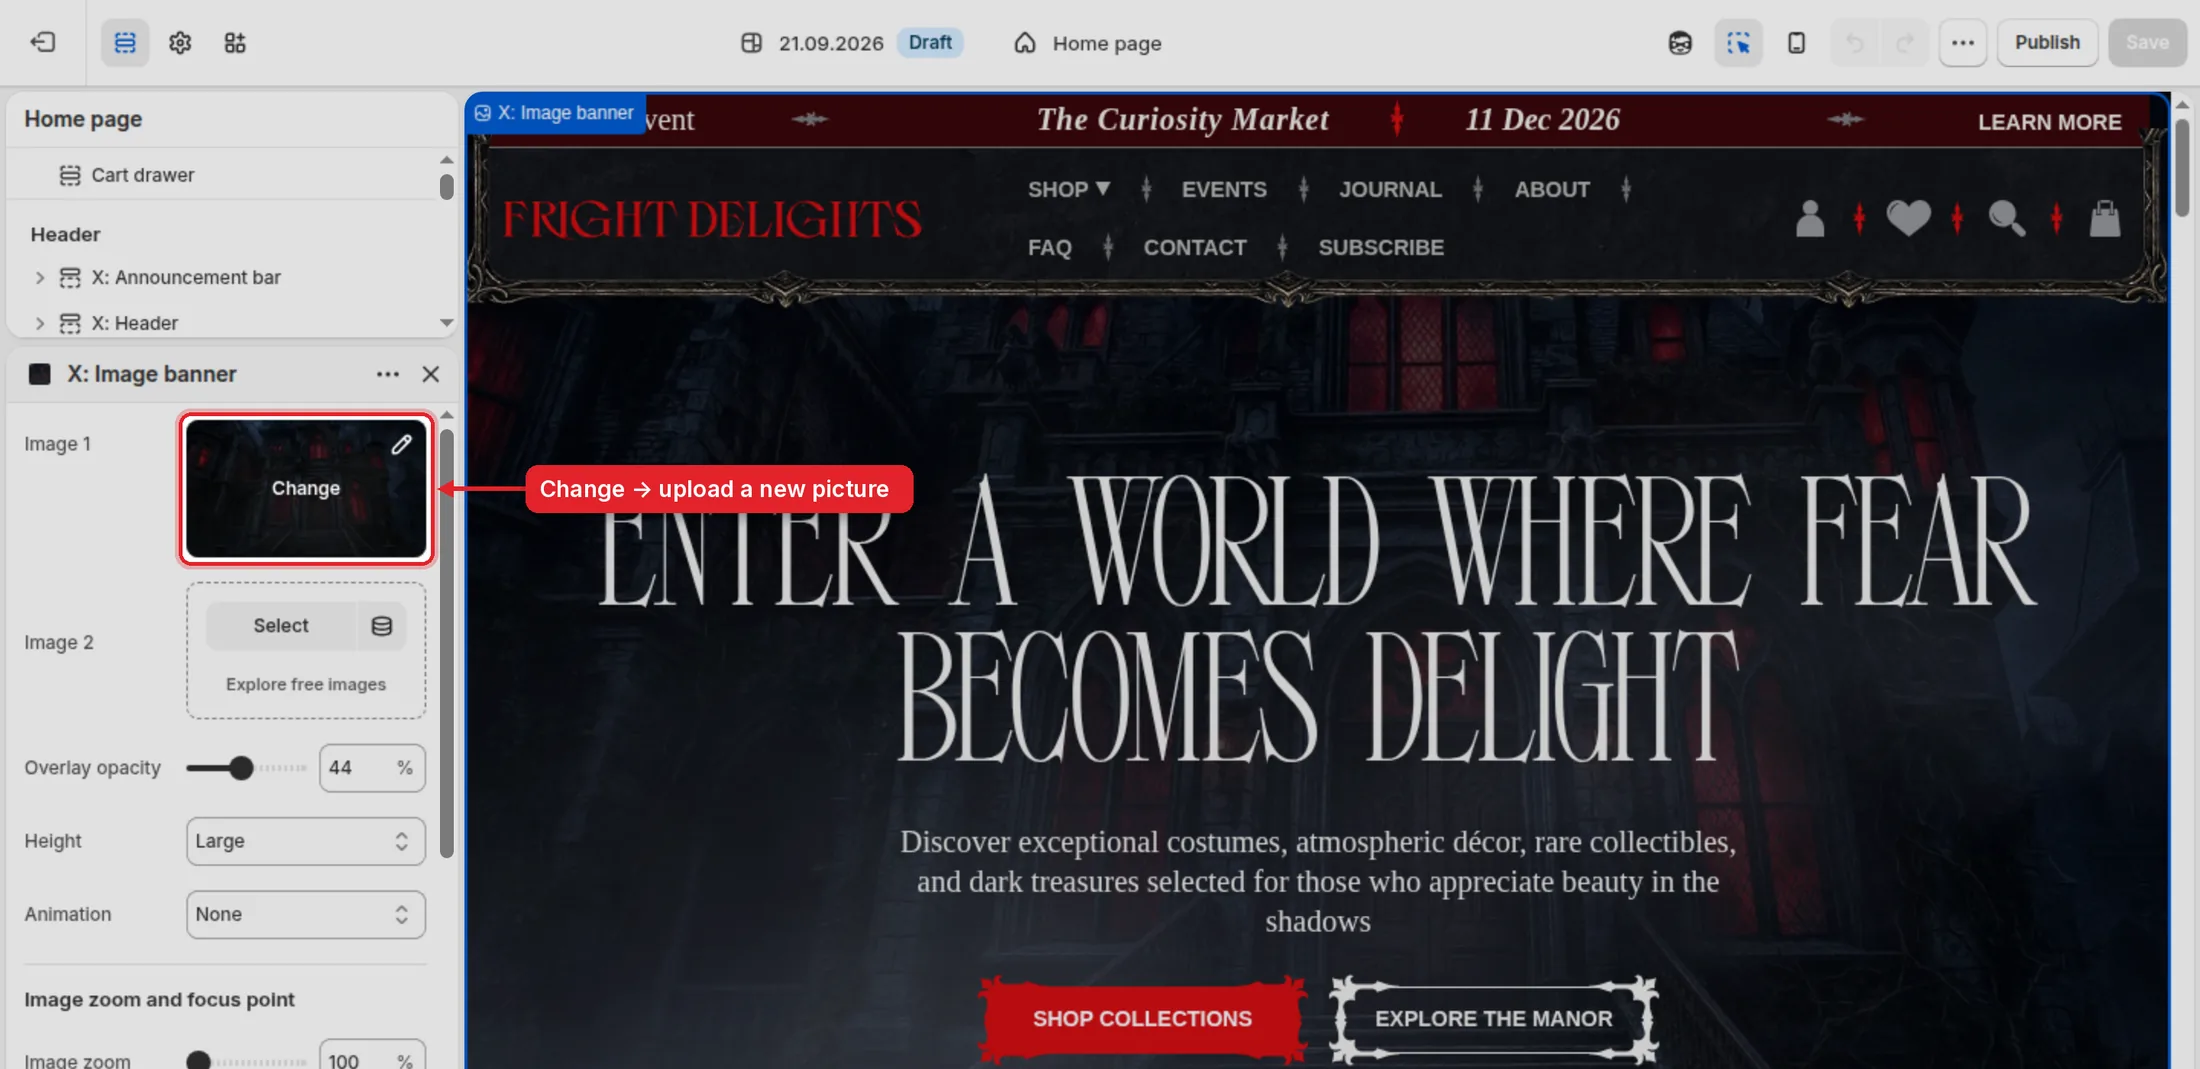
Settings of the banner block with the image and its Change button highlighted
1.6

Hide, move or add blocks

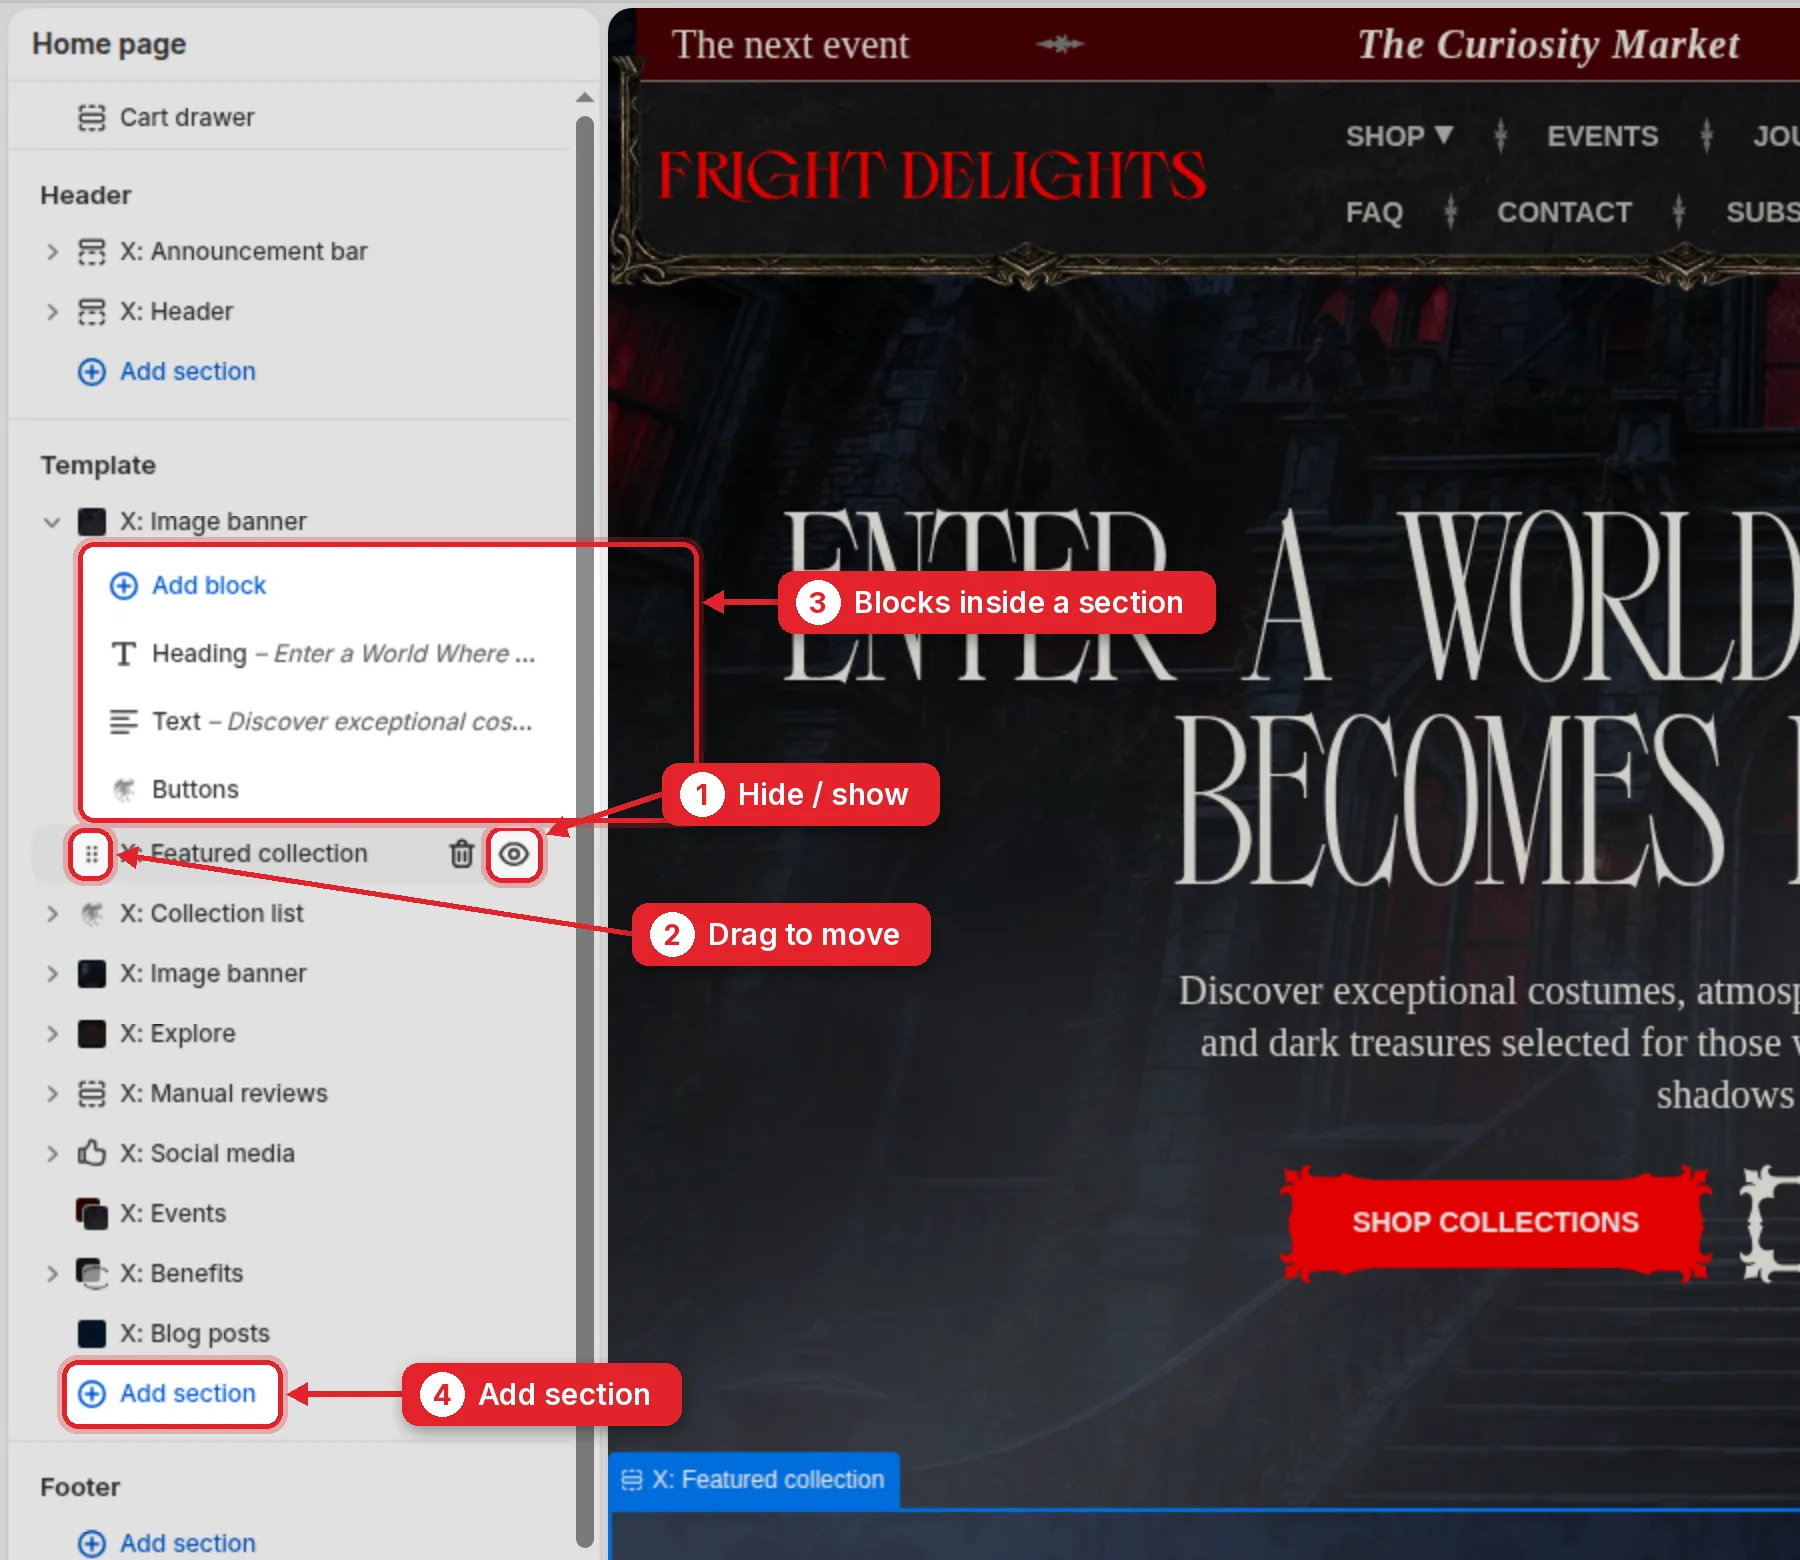
  1. 1Point at a line in the list: the eye hides or shows the block (a hidden block stays saved), the bin deletes it.
  2. 2Drag the six dots to move the block up or down the page.
  3. 3The small arrow opens the parts inside a block: heading, text, buttons. Add block adds one more part.
  4. 4Add section adds a new block to the page.
The list of page blocks with the hide icon, the drag handle, the parts of a block and Add section highlighted
1.7

Menus

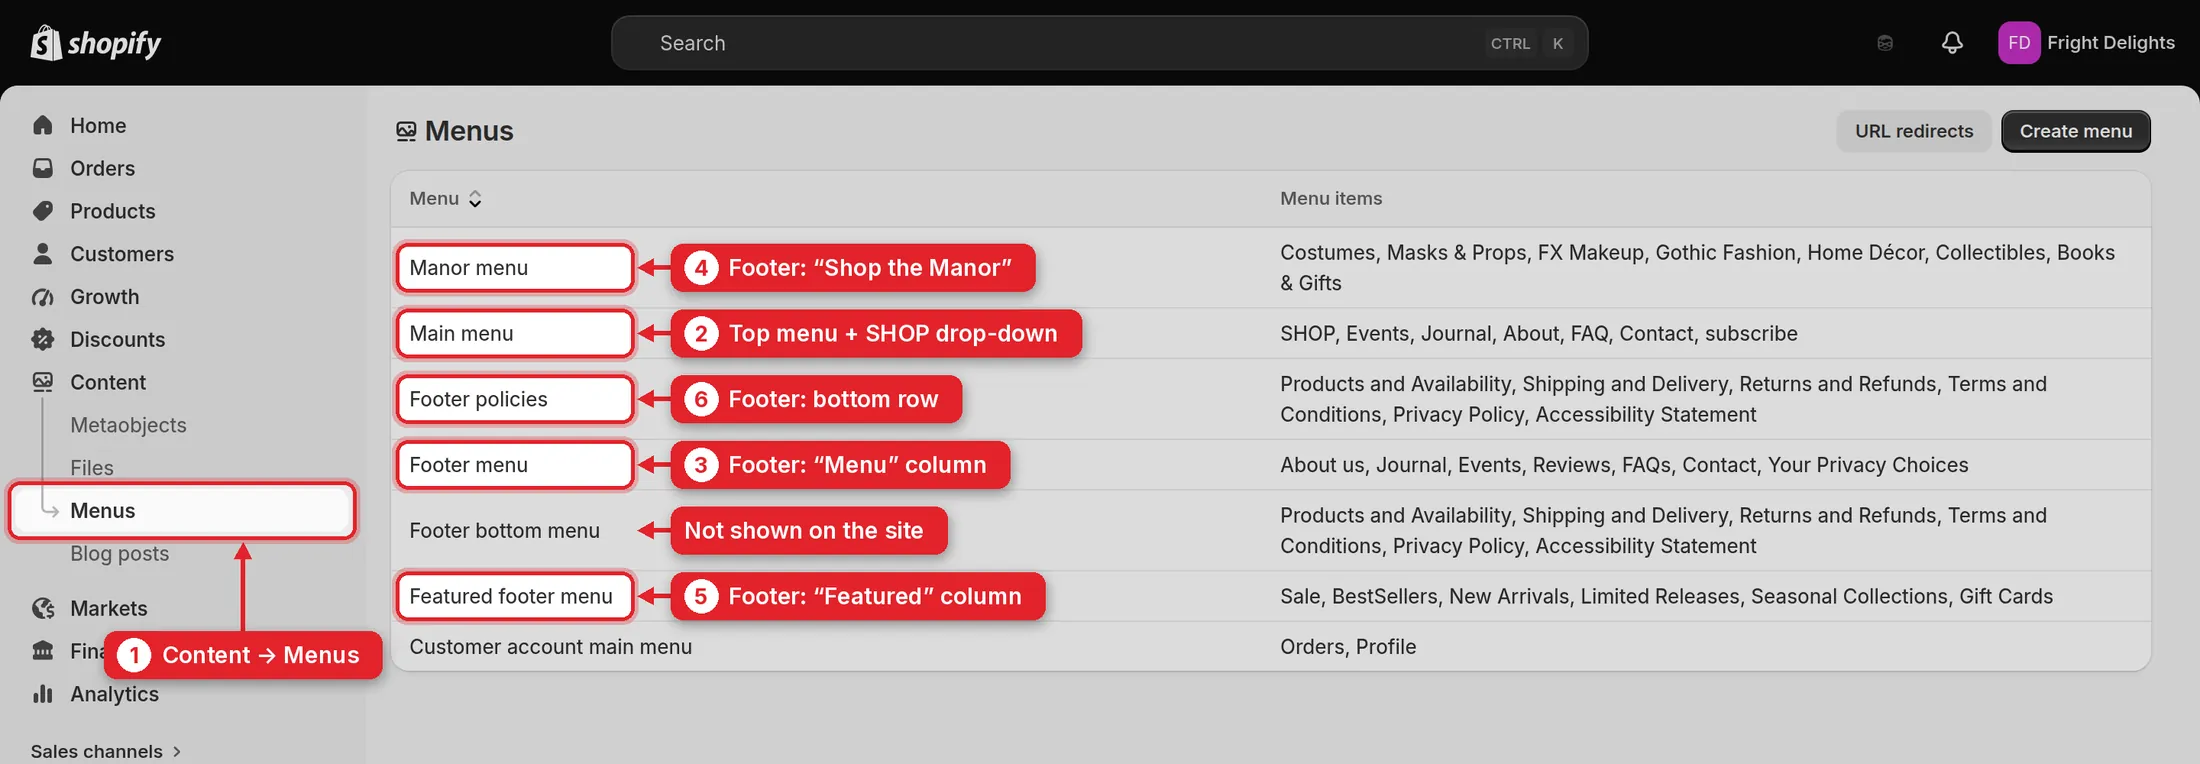
  1. 1The links in the top menu and in the footer are edited in Content → Menus.
  2. 2Main menu is the top navigation (SHOP, Events, Journal, About, FAQ, Contact, Subscribe), with everything inside the SHOP drop-down.
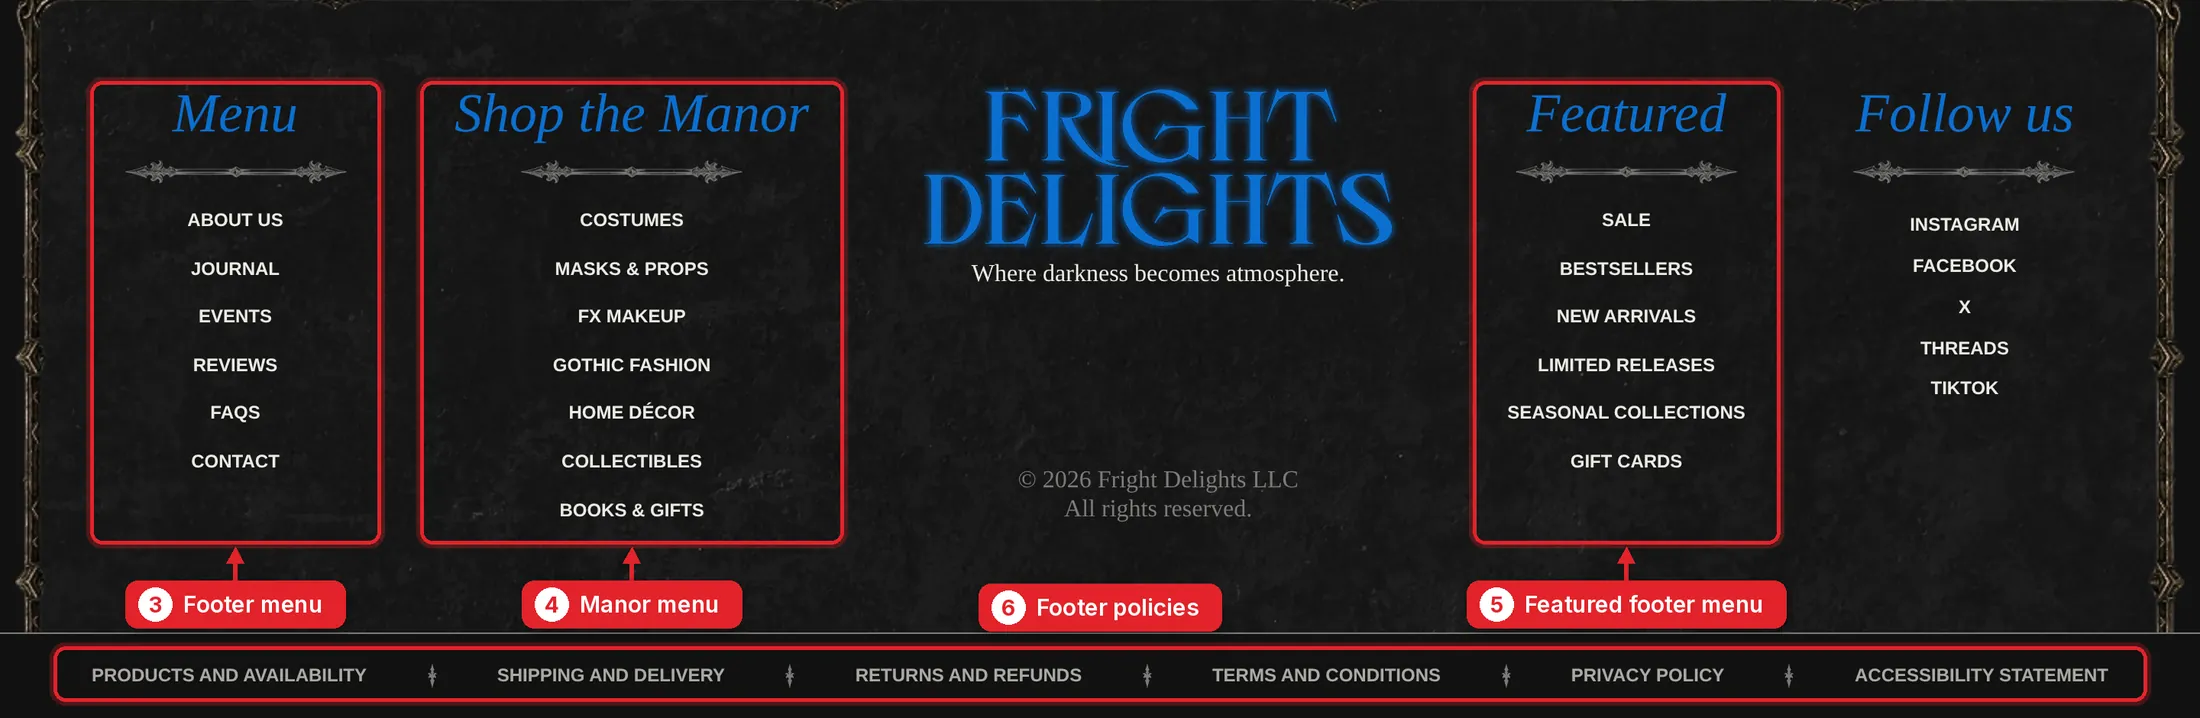
  3. 3Footer menu is the “Menu” column of the footer.
  4. 4Manor menu is the “Shop the Manor” column.
  5. 5Featured footer menu is the “Featured” column.
  6. 6Footer policies is the row of links at the very bottom: shipping, returns, privacy and so on.
Content, Menus page with every menu labelled with the part of the site it controls
The site footer with its columns and bottom row numbered by the menu that fills them
The footer on the site, with the same numbers

Part 2

Add a new product

Three things decide where a product appears: its Type (the SHOP menu), its tags (the collections) and two filter fields at the bottom of the product page. The bestsellers on the home page are picked by hand (2.7).
2.1

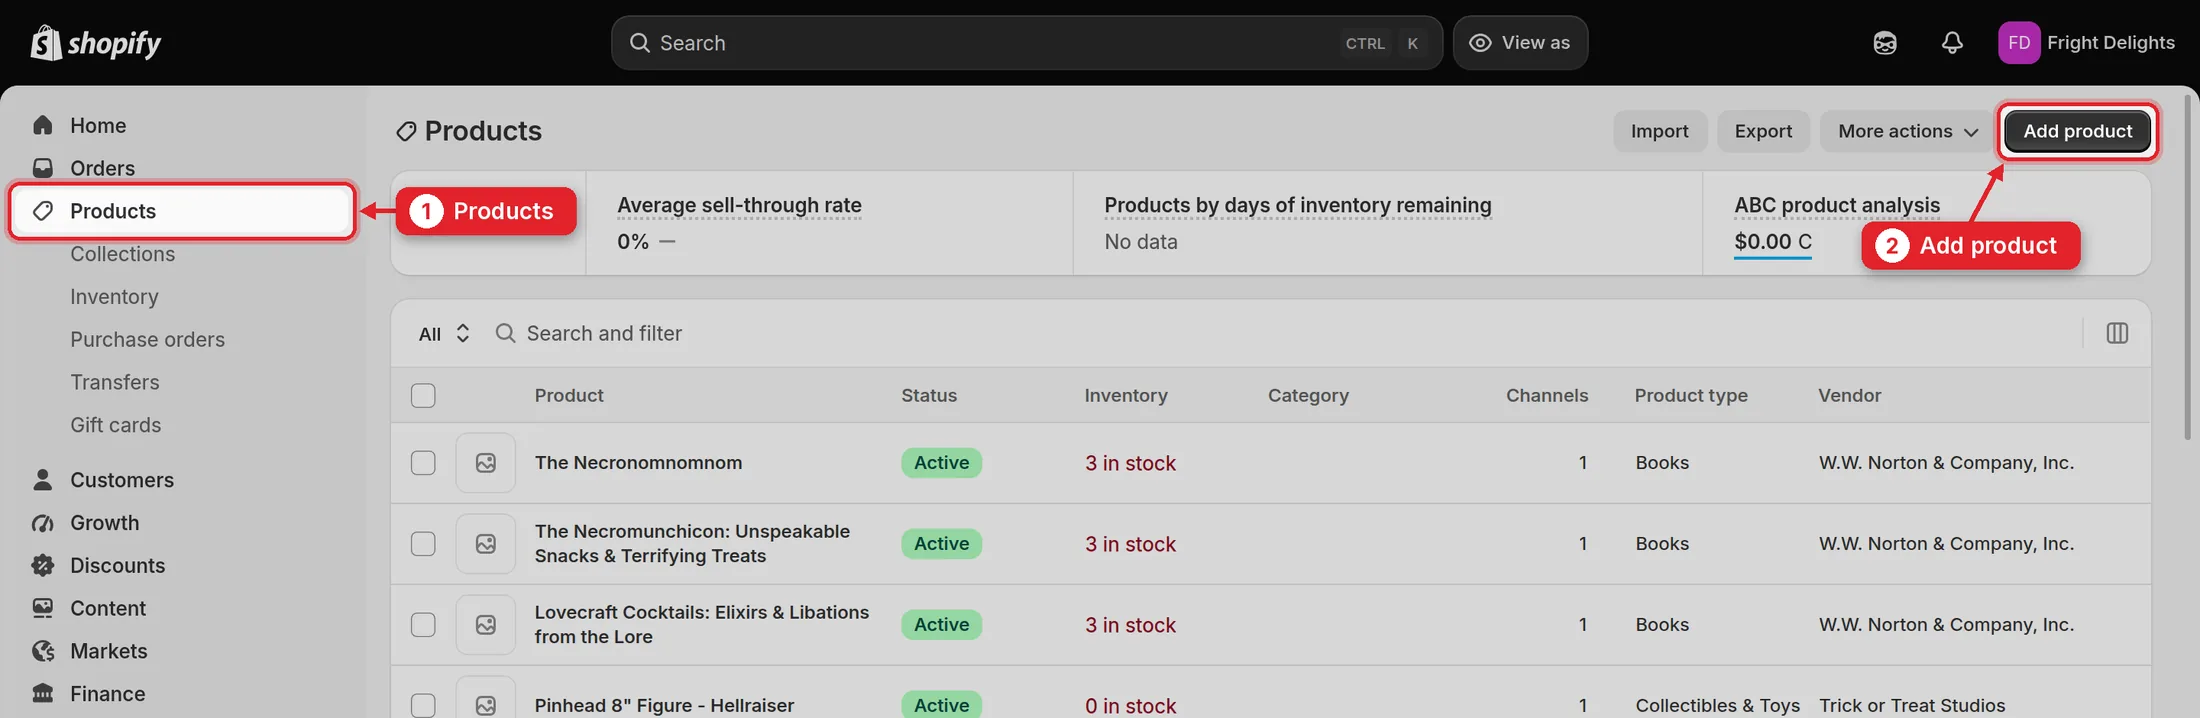
Start a new product

  1. 1Open Products.
  2. 2Click Add product.
Products list with the Products menu item and the Add product button highlighted
2.2

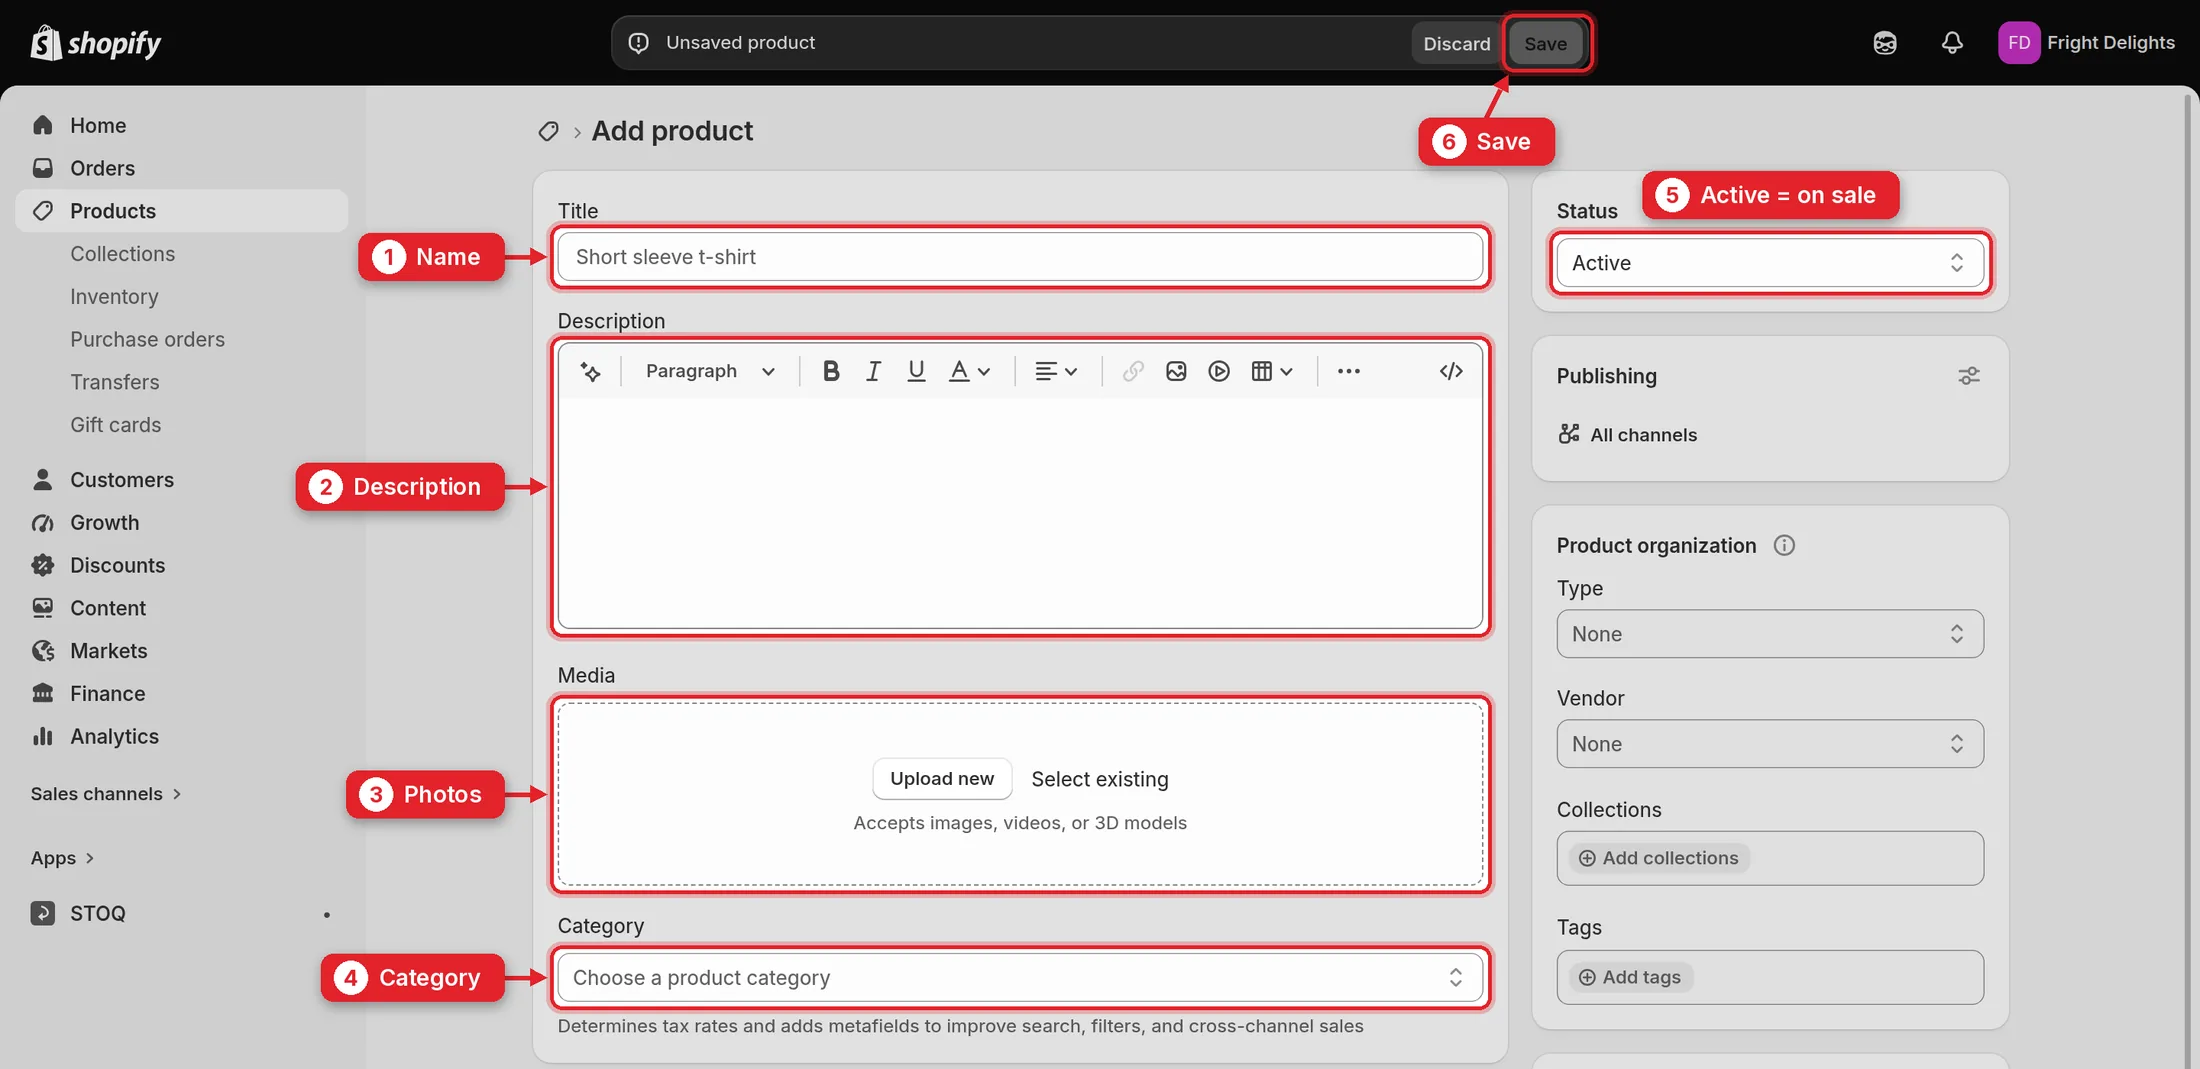
Name, description, photos

  1. 1Name, as customers will see it.
  2. 2Description: what it is, materials, sizes.
  3. 3Photos: drag the files here. The first photo is the main one; drag the photos to change their order.
  4. 4Category is optional, it is Shopify’s own classification. Never choose Event Tickets for a product: that turns it into an event.
  5. 5Status: Active is on sale, Draft is saved but hidden from visitors.
  6. 6Save when everything is filled in.
New product form with name, description, photos, category, status and Save highlighted
2.3

Price, stock and sizes

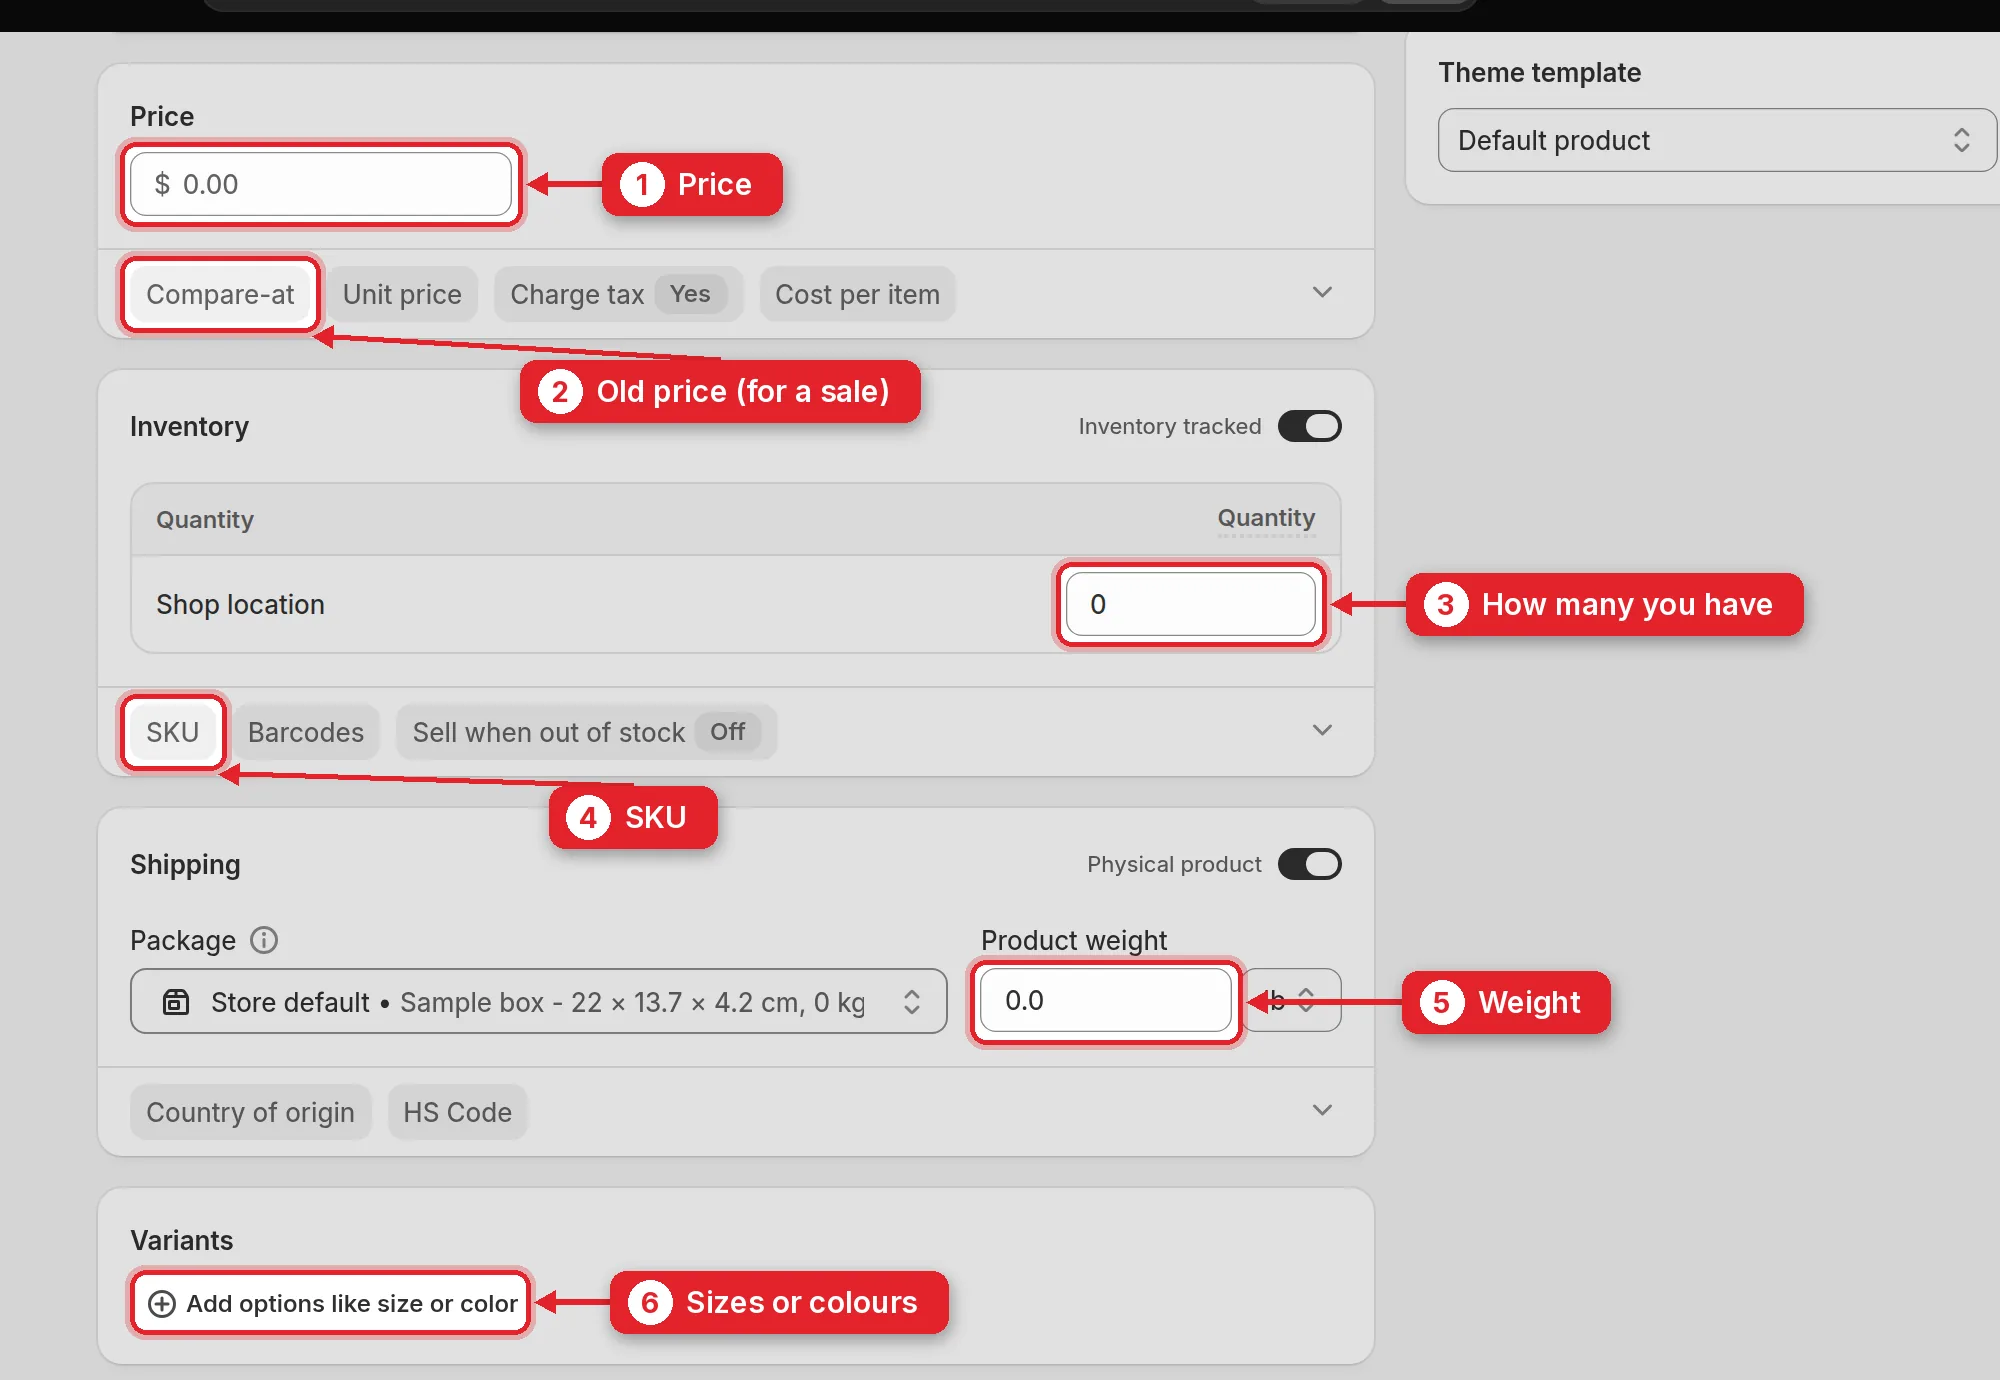
  1. 1Price.
  2. 2Compare-at is the old price. With it the product shows as discounted and joins the Sale collection by itself.
  3. 3How many you have in stock. At 0 the product shows as sold out, unless it is a pre-order (2.6).
  4. 4SKU, your stock code. Optional.
  5. 5Weight, used to calculate shipping.
  6. 6Sizes or colours: Add options like size or color creates variants, each with its own price and stock.
Price, compare-at price, stock quantity, SKU, weight and variants highlighted
2.4

Where the product appears: type and tags

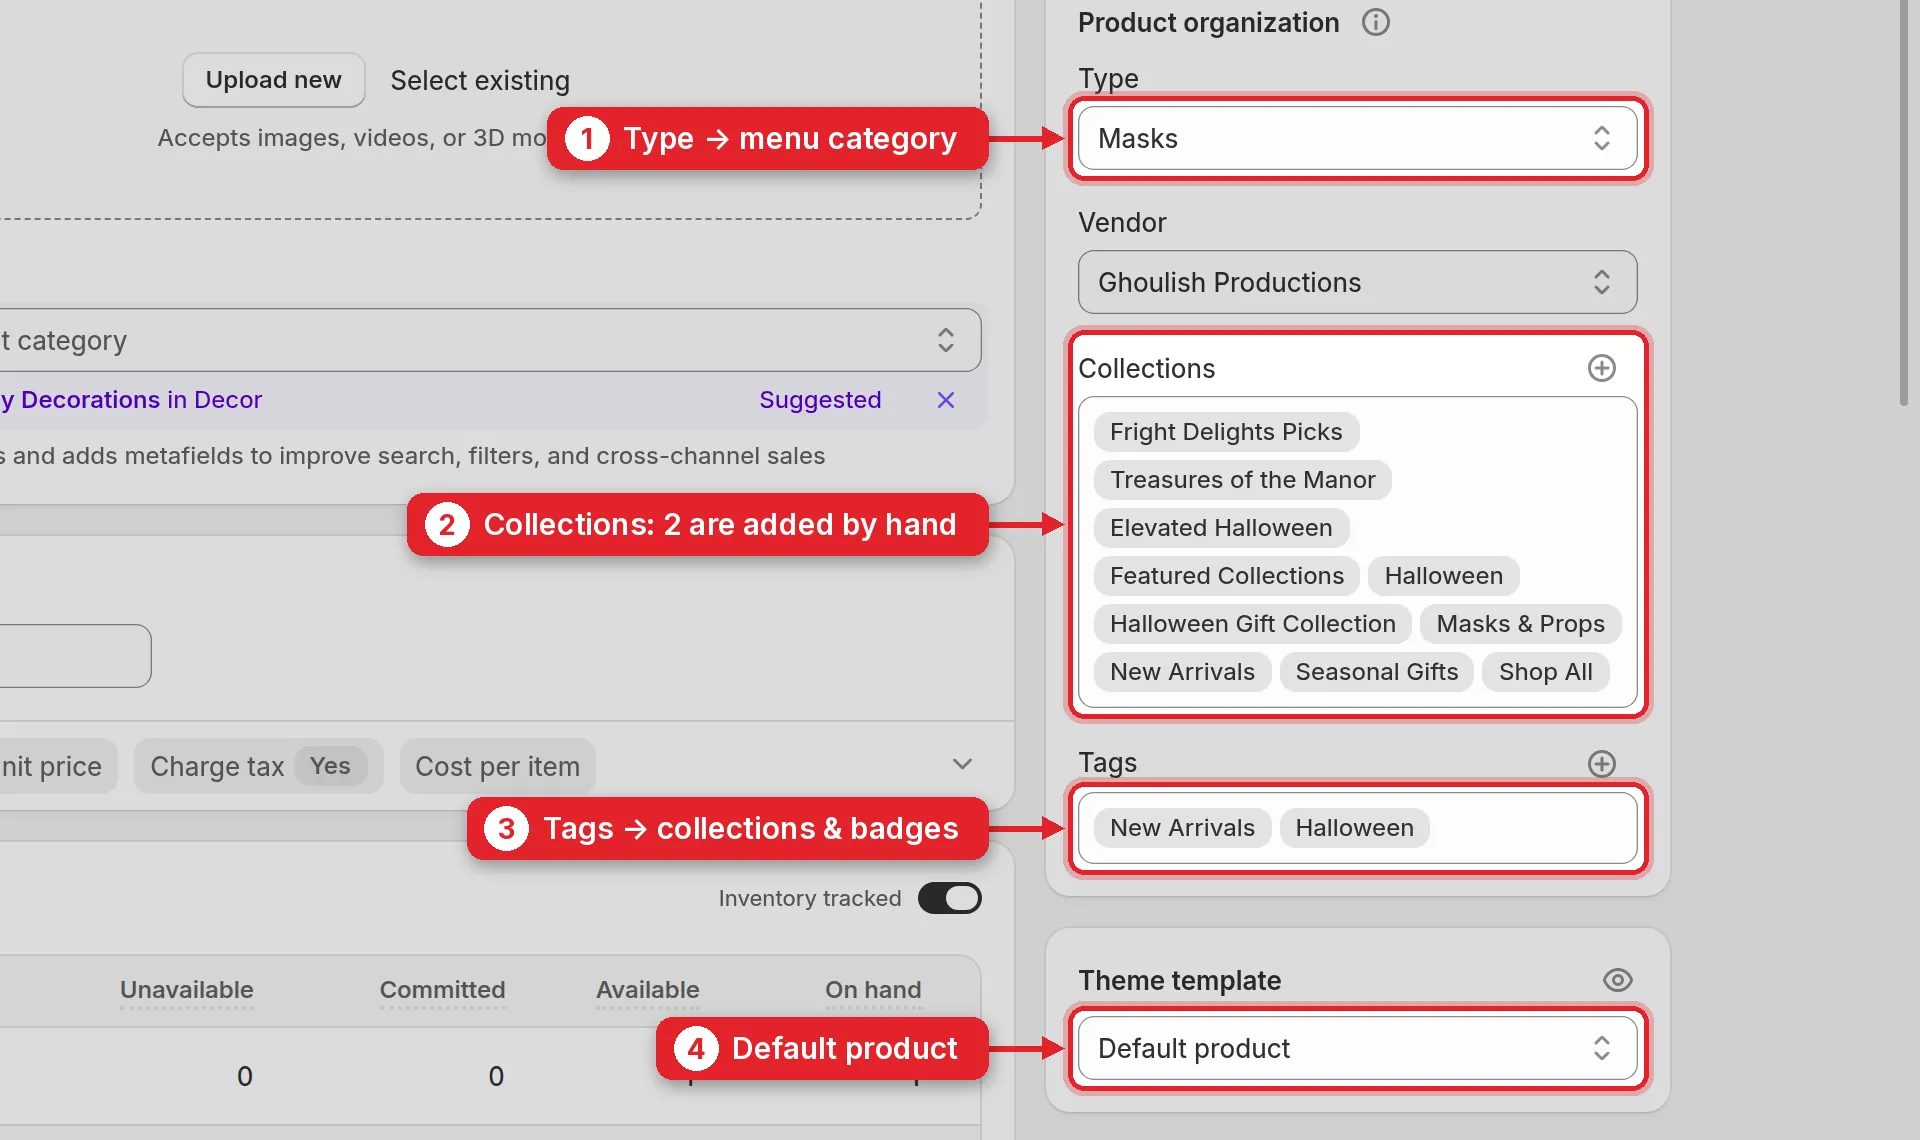
  1. 1Type: pick one from the list. It puts the product under SHOP → By Category and into Shop all (first table). Please don’t invent new types: a new type does not appear in the menu.
  2. 2Collections lists every collection the product is in. Only two are added by hand, with the + next to the title: Treasures of the Manor (the home page, see 2.7) and Fright Delights Picks. All the others fill themselves from the type and the tags.
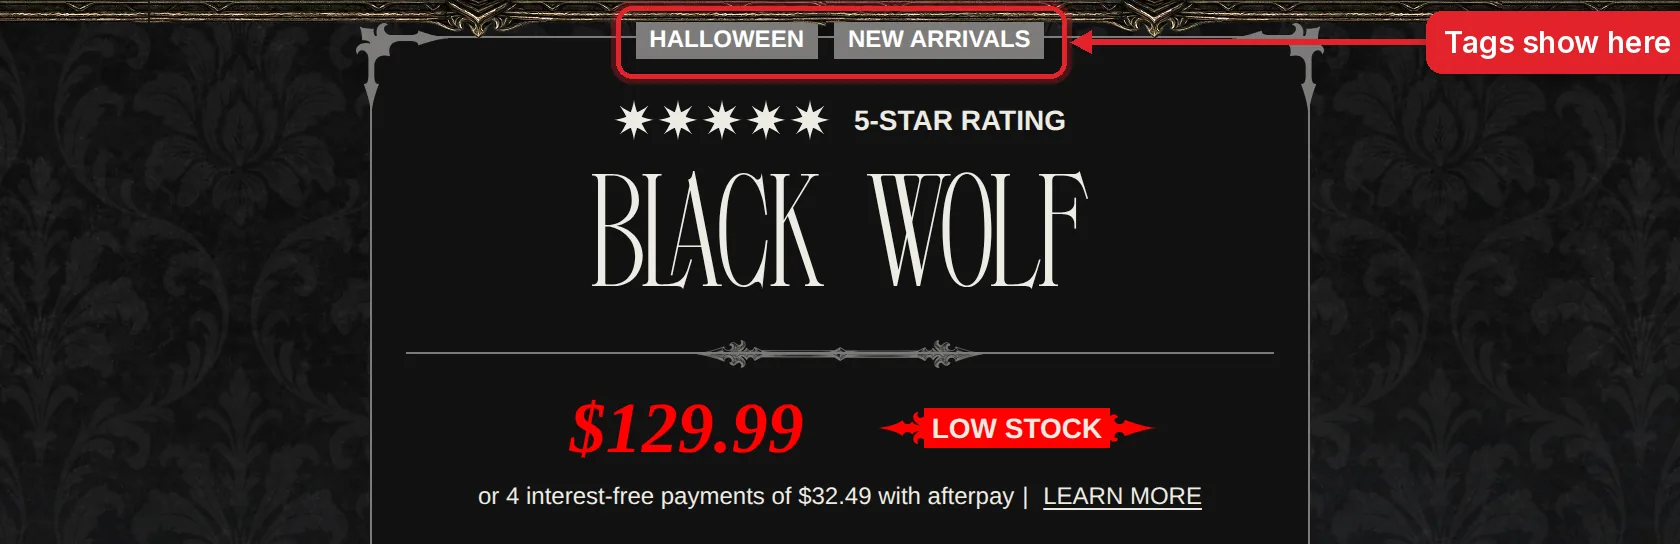
  3. 3Tags: each tag puts the product into a collection and shows as a small label above the product name (second table). Start typing and pick the tag from the list, so it is spelled exactly right.
  4. 4Theme template: keep Default product.
Product organization card with Type, Collections, Tags and Theme template highlighted

Type → SHOP › By Category

TypeMenu item
Apparel & CostumesCostumes
MasksMasks & Props
Makeup & FXFX Makeup
AccessoriesGothic Fashion
Collectibles & Toys, Tarot & DivinationCollectibles
Books, GamesBooks & Gifts
Props & Décoradd the tag Gothic Home Décor (→ Home Décor) or Masks & Props (→ Masks & Props)

Tag → collection

TagCollection
New ArrivalsNew Arrivals
HalloweenHalloween, Seasonal Gifts
Horror CultureHorror Culture
Independent CreatorsIndependent Creators
Oddities & CuriositiesOddities & Curiosities
Gothic LivingGothic Living
BestSellersBestsellers in the SHOP menu (not the home page block, see 2.7)
LimitedLimited Releases
SeasonalSeasonal Collections
Coming SoonComing Soon
SaleSale (a Compare-at price does the same)
preorderPre-orders + the “Pre-order” label, see 2.6
Curated GiftsCurated Gifts, and the “under $25 / $50 / $100” gift sets by price
Gifts for Her Gifts for HimGifts for Her, Gifts for Him
Christmas Valentine's Day Mother's Day Father's Day EasterSeasonal Gifts
Product page on the site with the tags shown as labels above the name
On the product page the tags show as labels above the name
2.5

Filters on the collection pages

Scroll to the bottom of the product page, to Product metafields.

  1. 1Filter by collections: pick the same collections as the tags, for example New arrivals and Halloween. This fills the COLLECTION filter.
  2. 2Excerpt: an optional one-line text, shown on the Curated Gifts cards.
  3. 3Category: pick the same value as the Type. This fills the CATEGORY filter.

Event address and Event date are for events only, so leave them empty. Click Save: the product shows on the site within a minute, and collections and filters update by themselves.
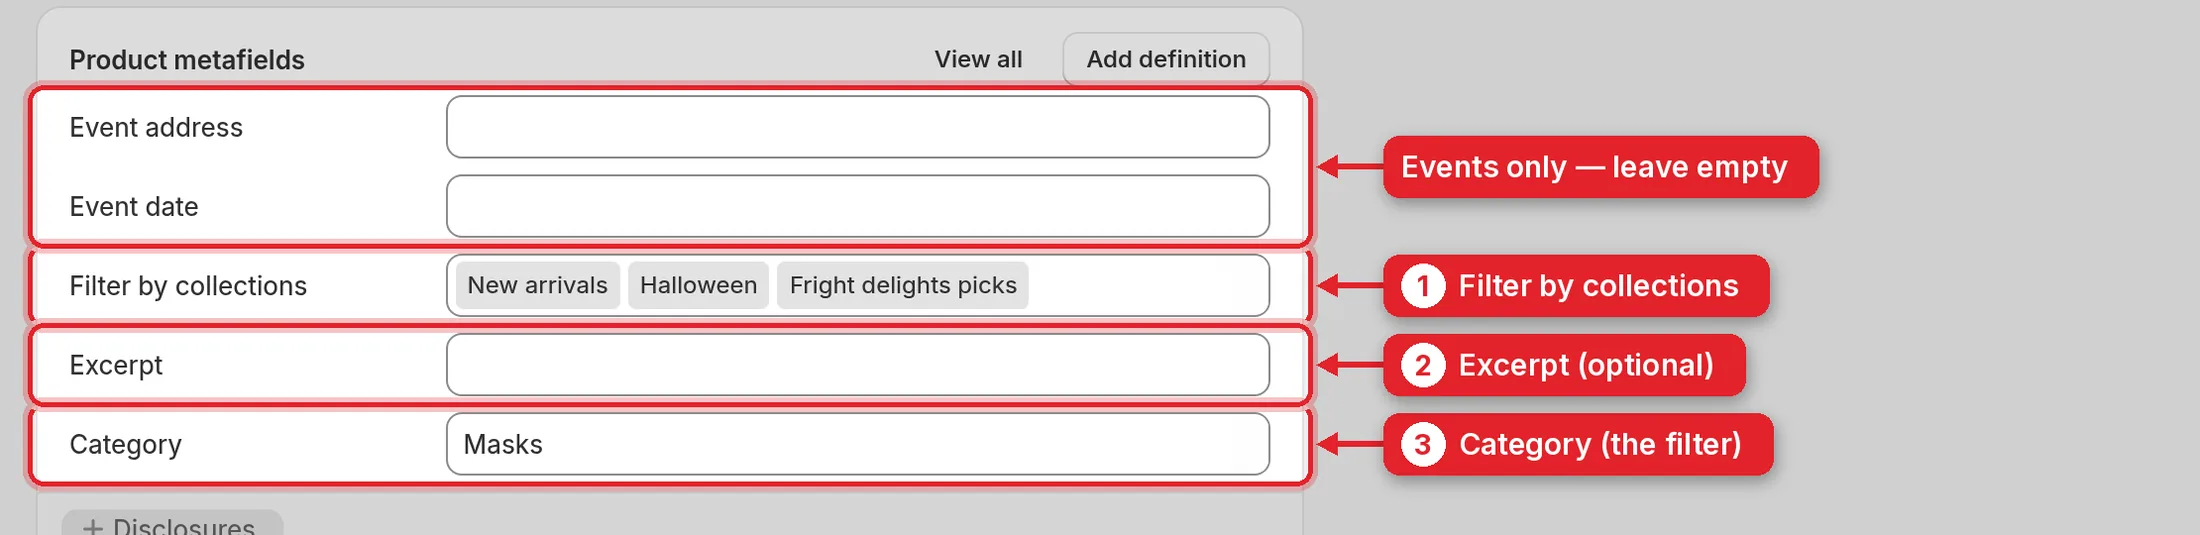
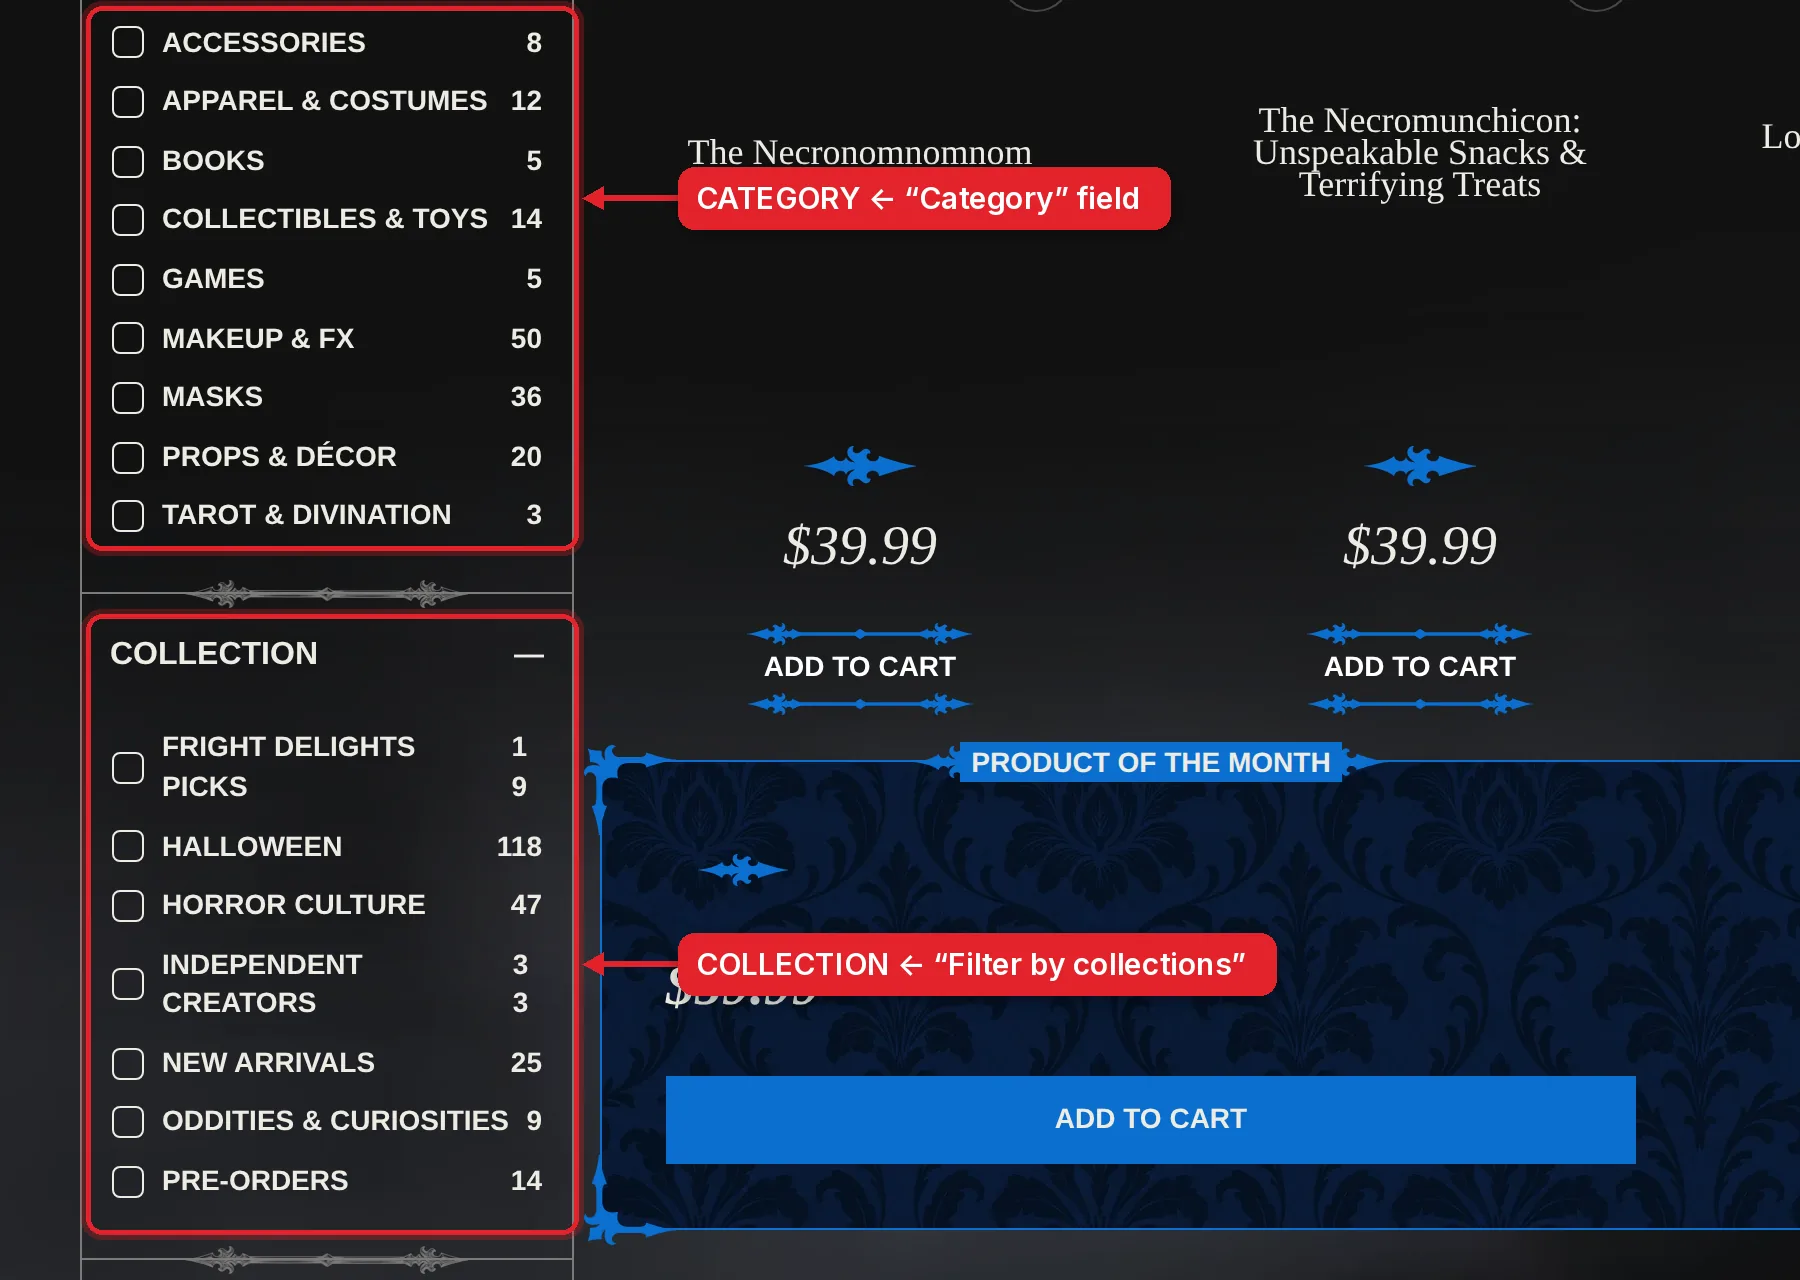
Product metafields card with Filter by collections, Excerpt and Category highlighted
The CATEGORY and COLLECTION filters on a collection page
The two fields feed the filters on every collection page
2.6

Pre-orders

For an item you sell before it arrives:

  • set the stock quantity to 0;
  • add the tag preorder, and in Filter by collections pick Pre-orders;
  • save, then open Apps → STOQ → Preorders, open the Pre-orders offer and add the product there.

New products are not added to the offer automatically. The free STOQ plan covers 10 pre-orders a month.
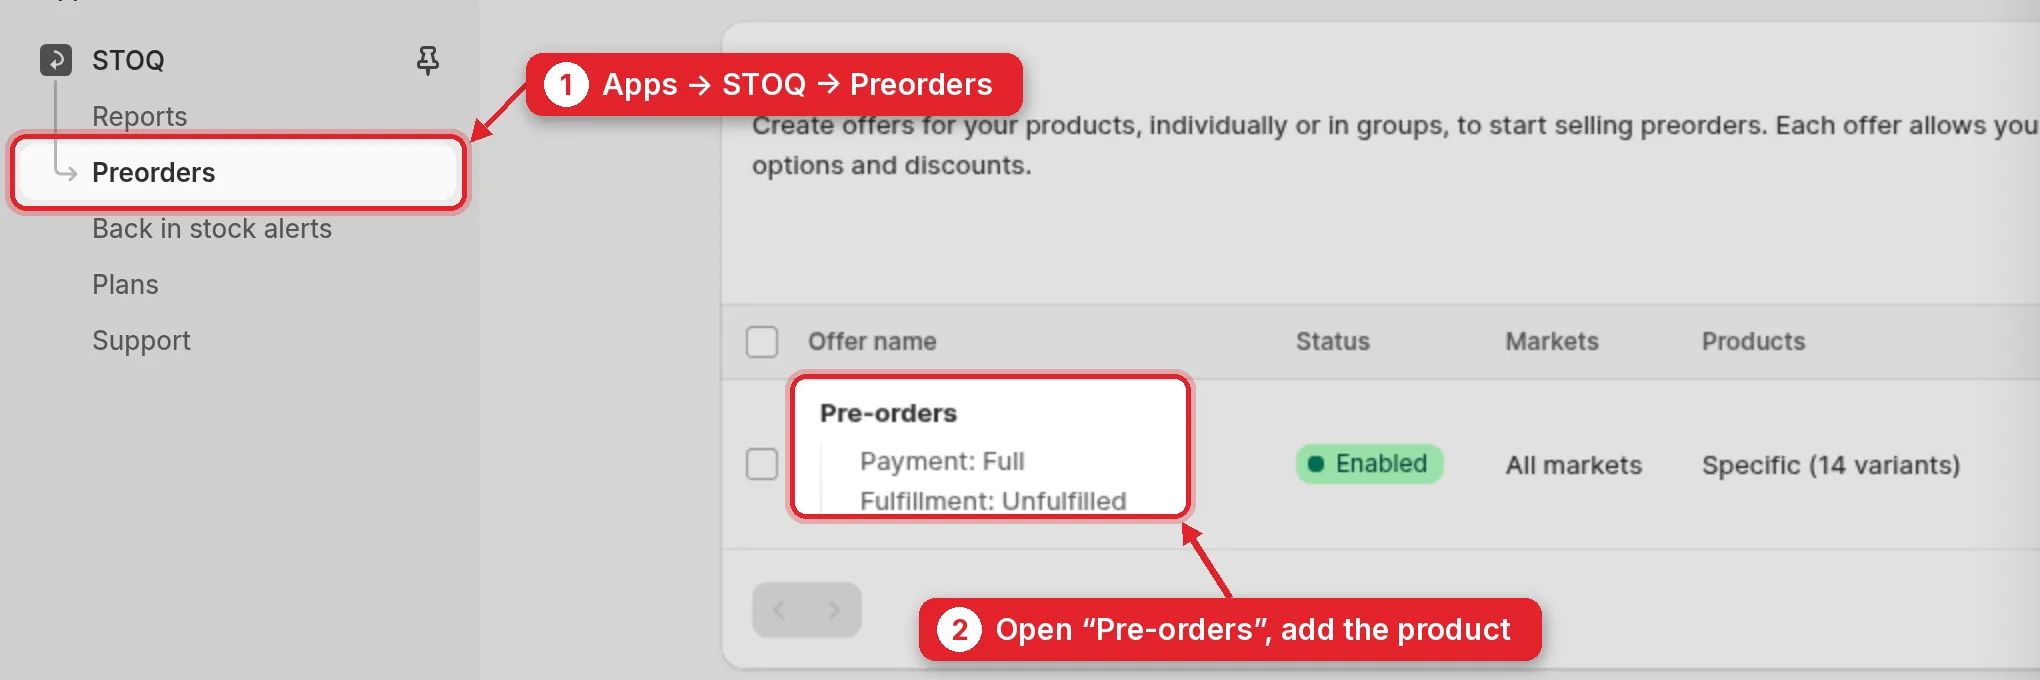
STOQ Preorders page with the Pre-orders offer highlighted
2.7

Show a product on the home page

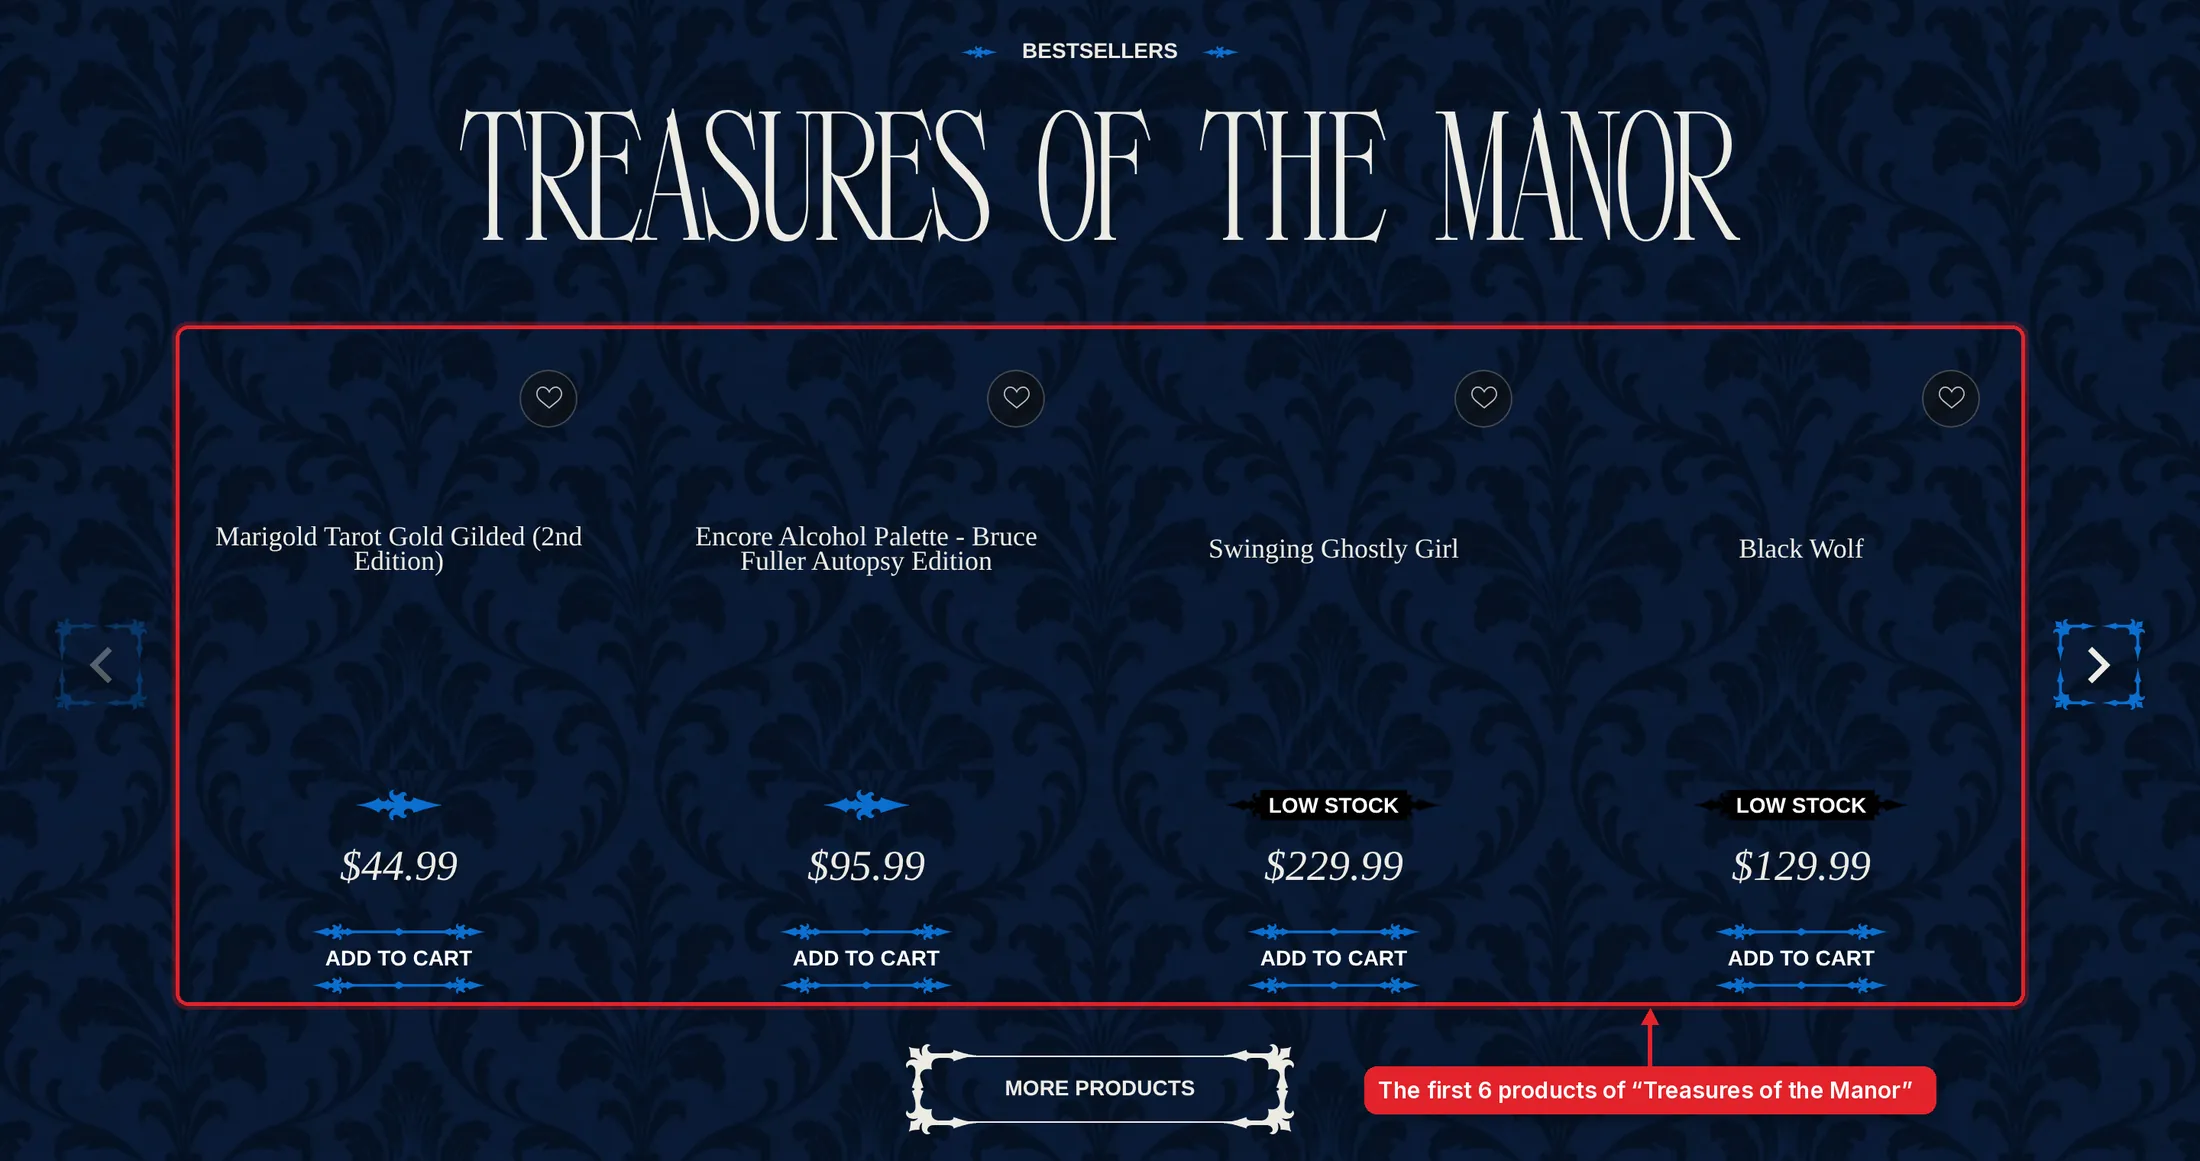
The Bestsellers block “Treasures of the Manor” on the home page shows the products of the collection with the same name. This collection is filled by hand: a new product appears there only after you add it.

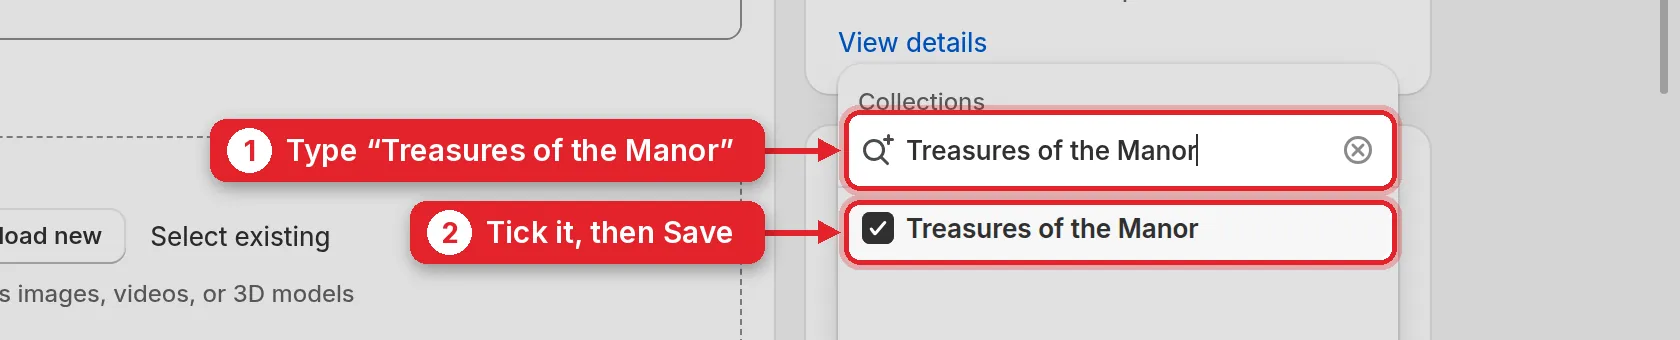
Open the product, find Collections in Product organization and click the + next to it:
  1. 1Type “Treasures of the Manor”.
  2. 2Tick it and click Save. To take a product off the home page, untick it the same way.
The Treasures of the Manor block on the home page with its products highlighted
The block on the home page
The collections list of a product with Treasures of the Manor typed in and ticked
2.8

Choose which products the home page shows

The block shows the first 6 products of the collection. To choose which six, open Products → Collections → Treasures of the Manor:

  1. 1Switch to the list view.
  2. 2The order here is the order on the site while Default sort stays on Manually. Drag a product by the six dots to move it: the top six are on the home page.
  3. 3This button adds or removes several products at once: tick or untick them and click Done.

If a Save button appears at the top of the page, click it.
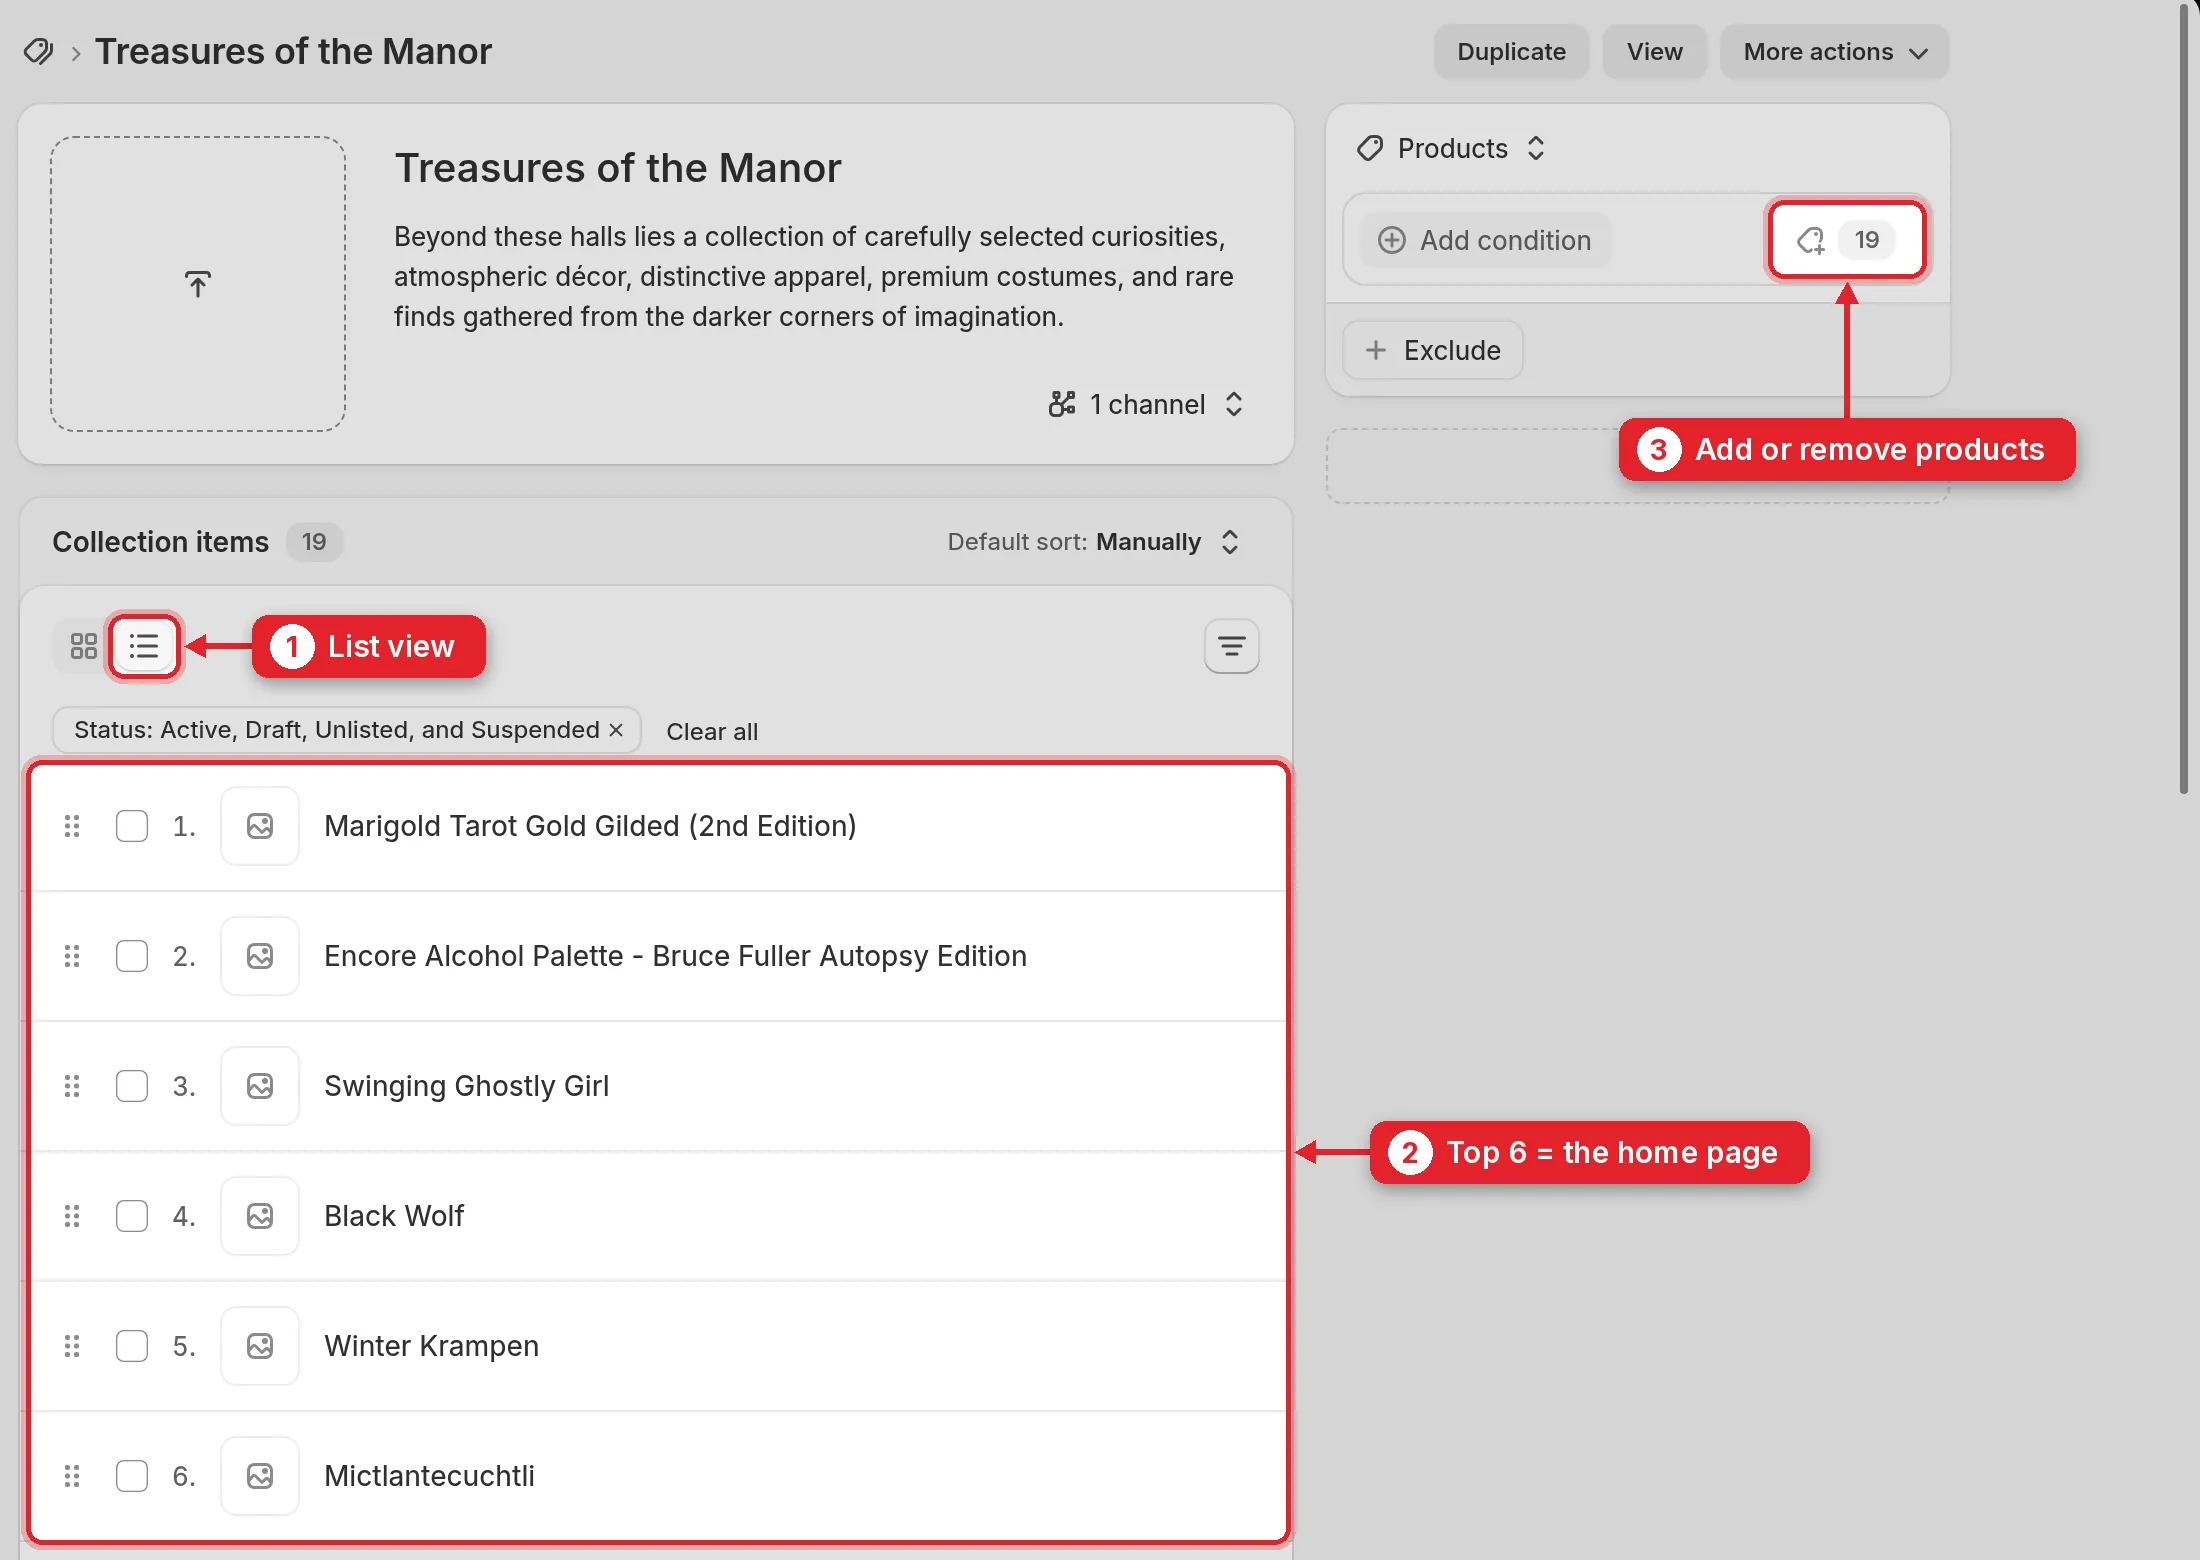
The Treasures of the Manor collection in list view with the first six products and the add or remove button highlighted

Part 3

Add an event

An event is a product too: the ticket. Once its category is Event Tickets, it appears by itself on the Events page, in the list of all events and on the home page.

3.1

Create the event

Products → Add product, then:

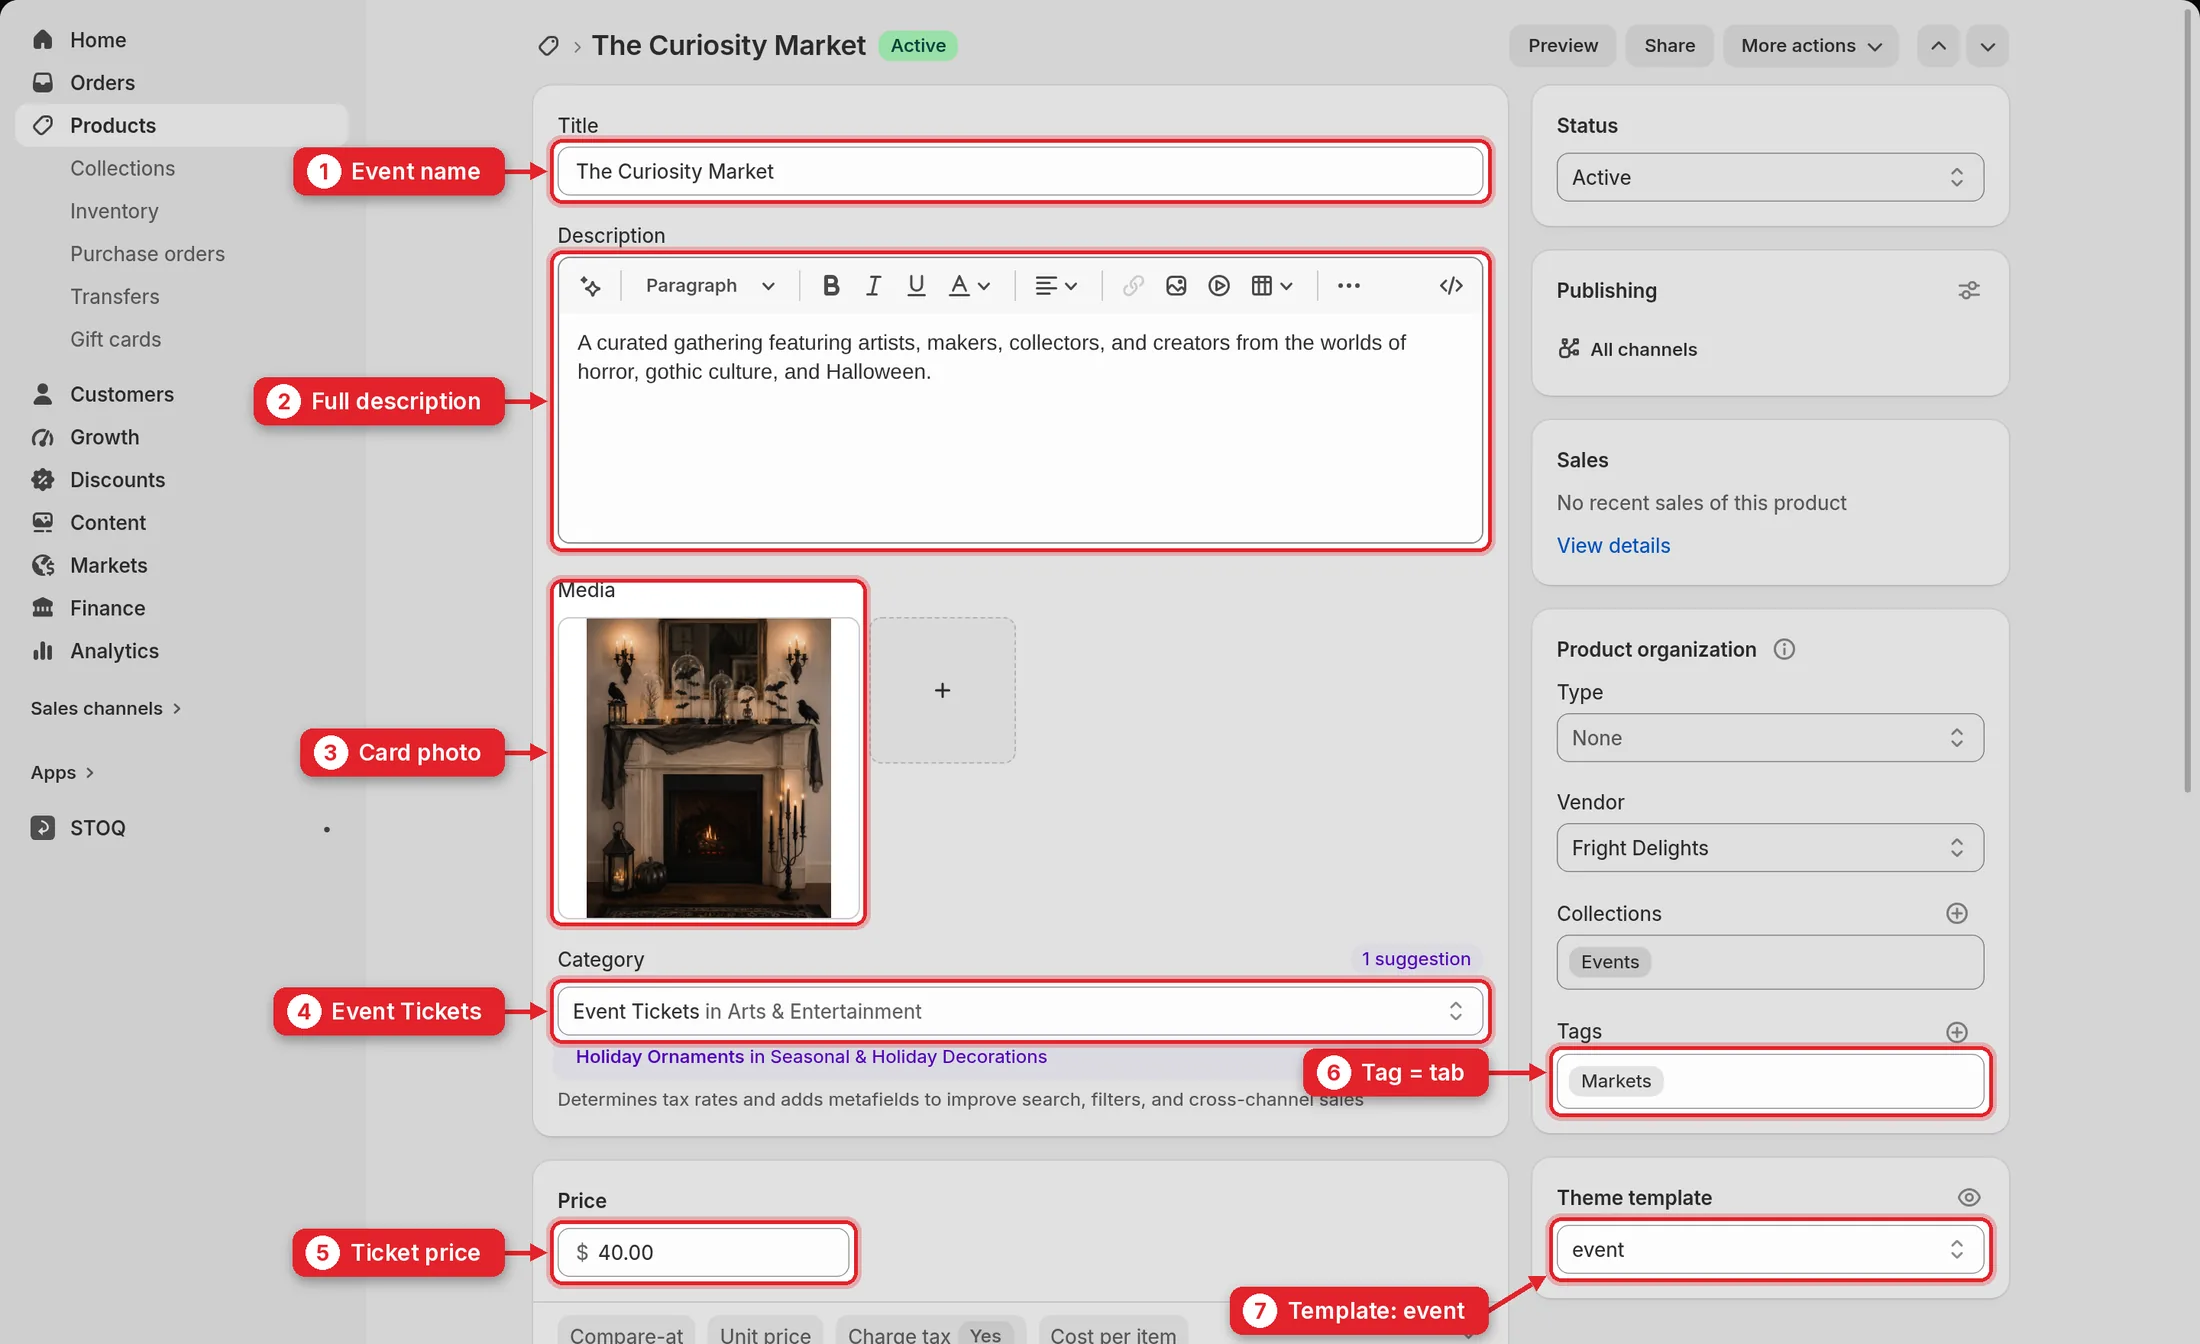
  1. 1Event name.
  2. 2Full description, shown on the event’s own page.
  3. 3Photo. The first photo is used on the event card and on the event page.
  4. 4Category: type “Event Tickets” and choose Event Tickets in Arts & Entertainment. This is what makes it an event.
  5. 5Ticket price.
  6. 6Tag: one of Workshops Markets Seasonal Community. It decides the tab the event sits under.
  7. 7Theme template: choose event.
An event product with name, description, photo, category Event Tickets, price, tag and template highlighted
3.2

Number of tickets

In Inventory enter how many tickets you sell. When it reaches 0, tickets can no longer be bought.

Inventory of the event with the available quantity highlighted
3.3

Place, date and short text

Scroll down to Product metafields:

  1. 1Event address: the venue and street, or “Online”.
  2. 2Event date: pick it in the calendar.
  3. 3Excerpt: one or two sentences for the event card.

Click Save. Leave Filter by collections and Category empty for events.
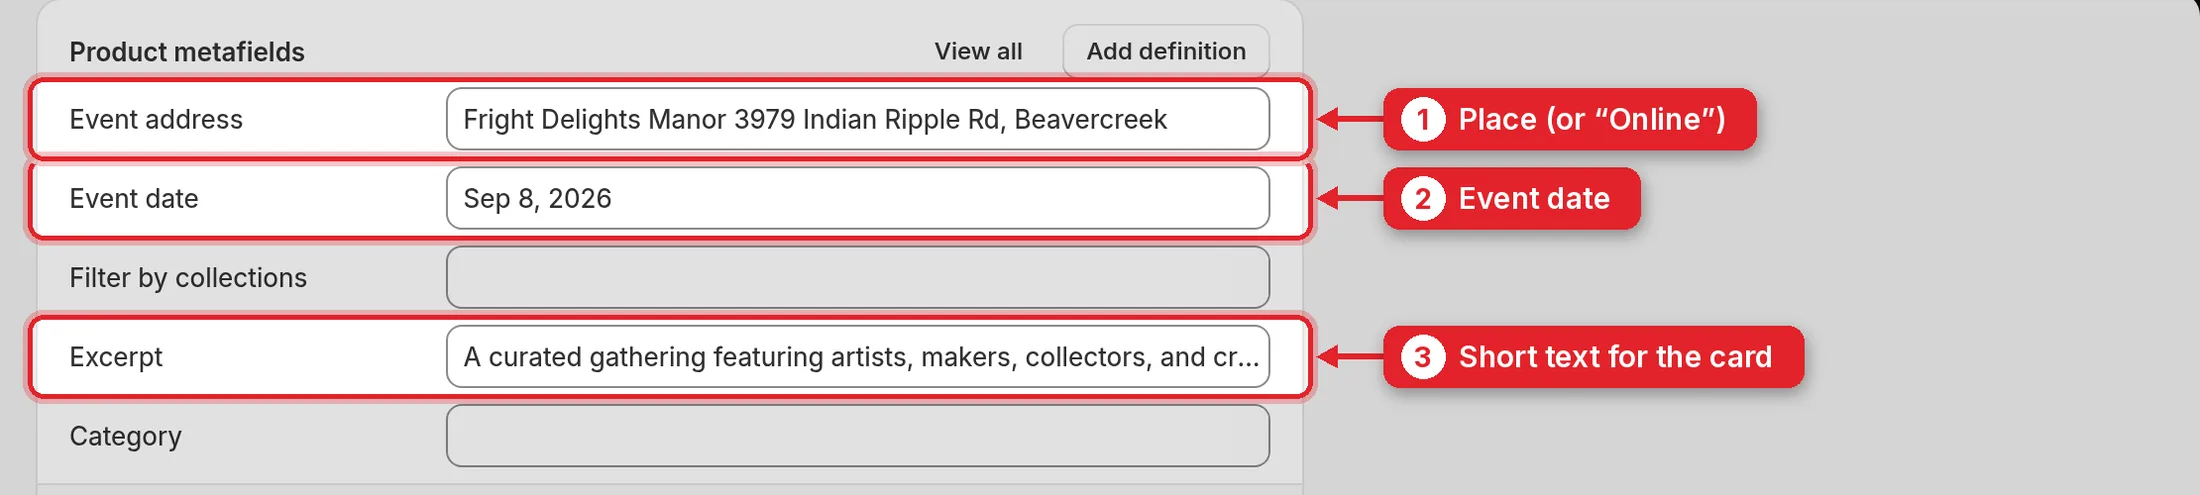
Product metafields of the event with address, date and excerpt highlighted
3.4

How it shows on the site

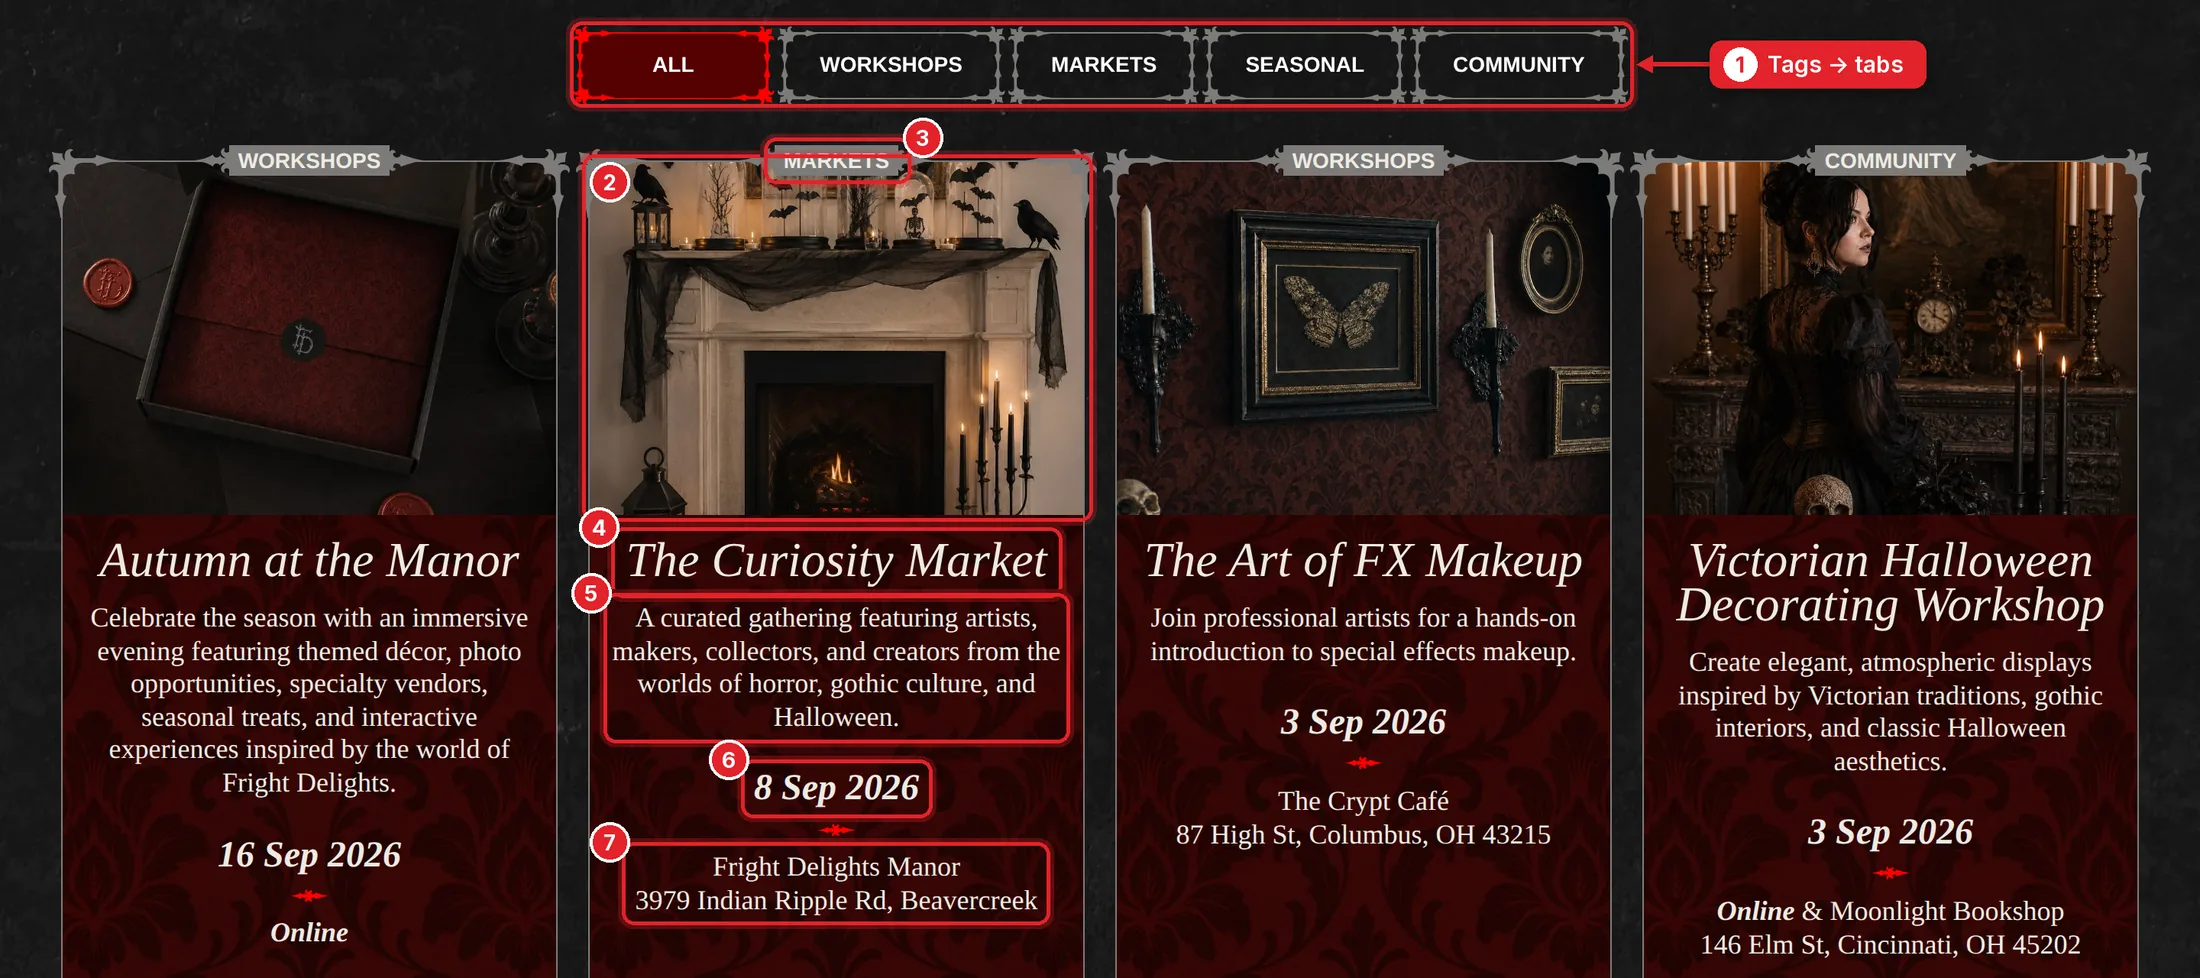
  1. 1The tags become the tabs of the event list.
  2. 2Photo
  3. 3Tag
  4. 4Event name
  5. 5Excerpt
  6. 6Event date
  7. 7Event address
The list of events on the site with the tabs and the parts of one event card numbered
The list of all events
3.5

The big “Upcoming Events” card

On the Events page the large card shows the nearest upcoming event by date. To change it, open the theme editor, choose Pages → events-experiences and click the block X: Featured article.

Leave Event (overrides the collection) empty to follow the dates automatically, or pick an event to pin it. The Curiosity Market is pinned there now, so clear the field once your real events are in. The red label above the card is Badge label (empty shows “Event of the month”).
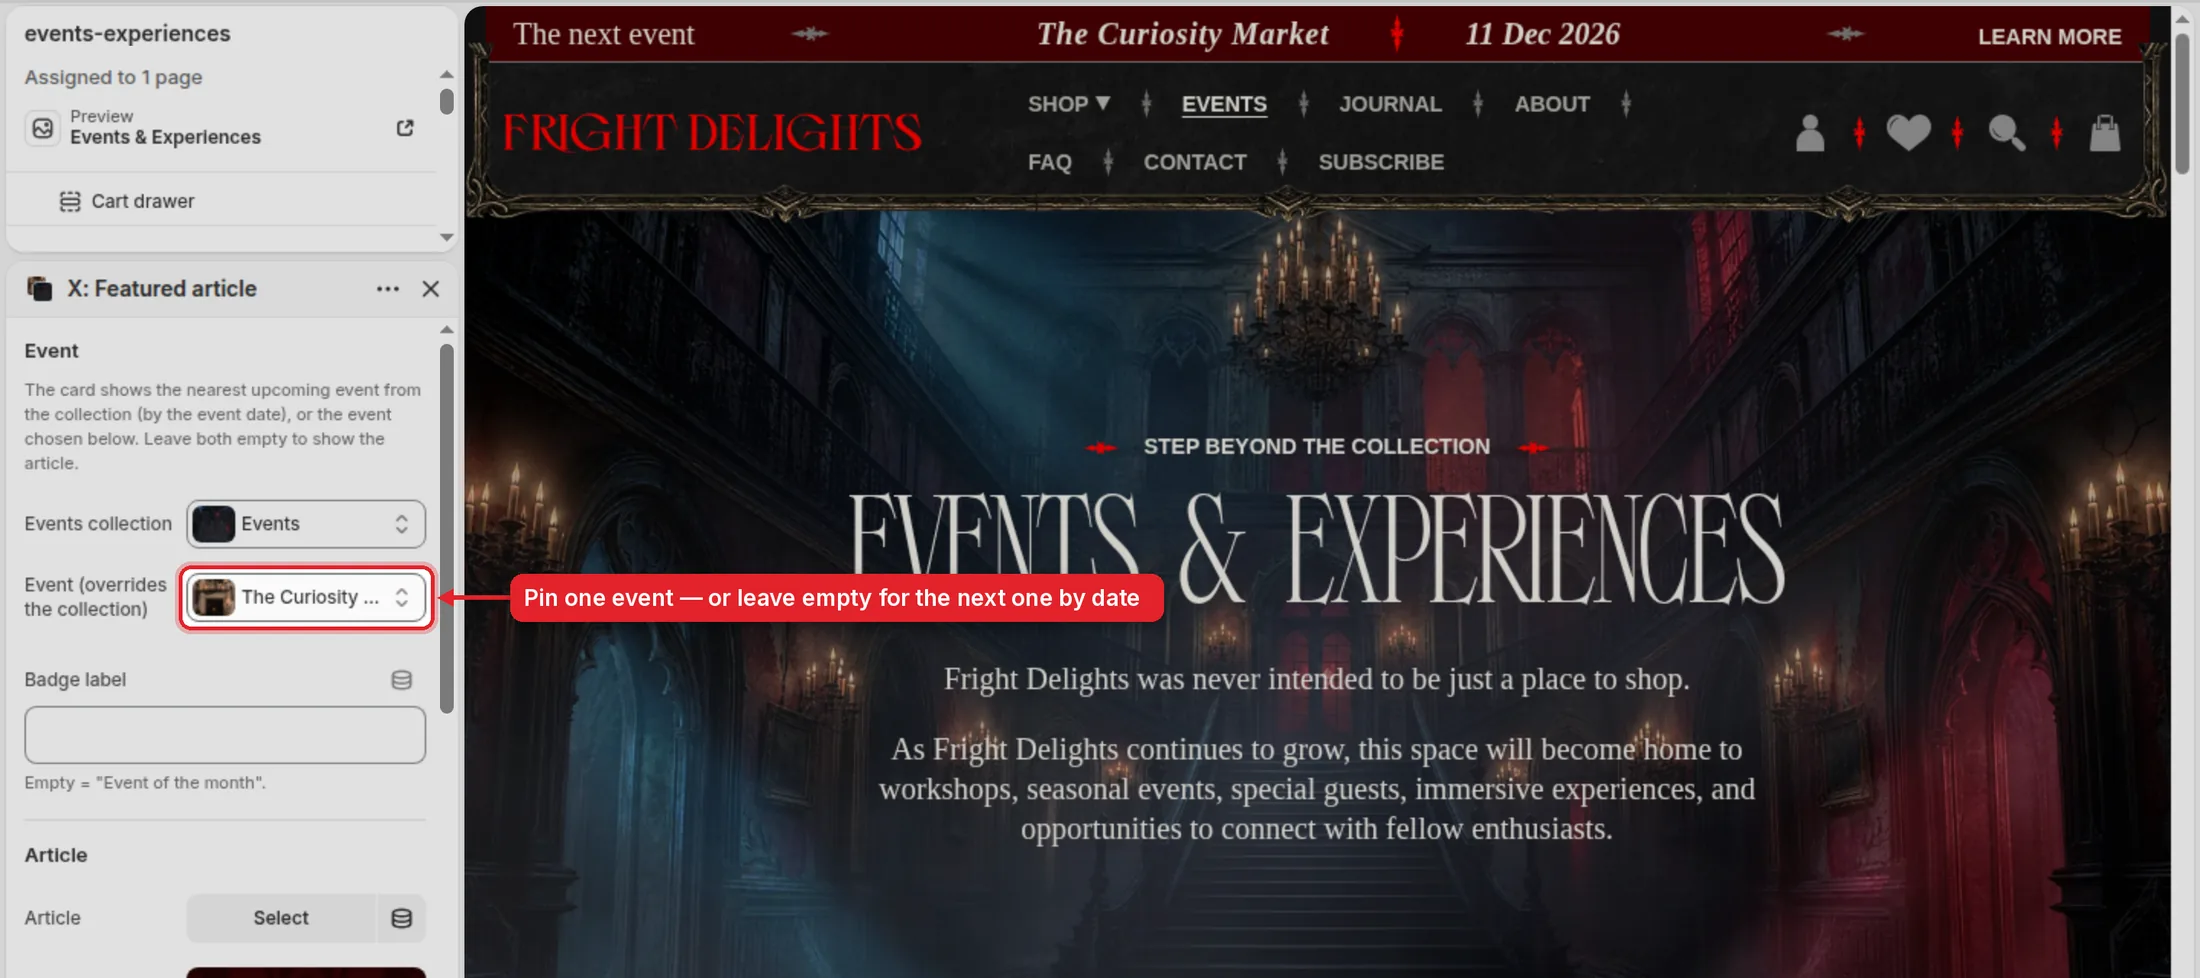
Theme editor, Events page, settings of the Upcoming Events card with the event picker highlighted
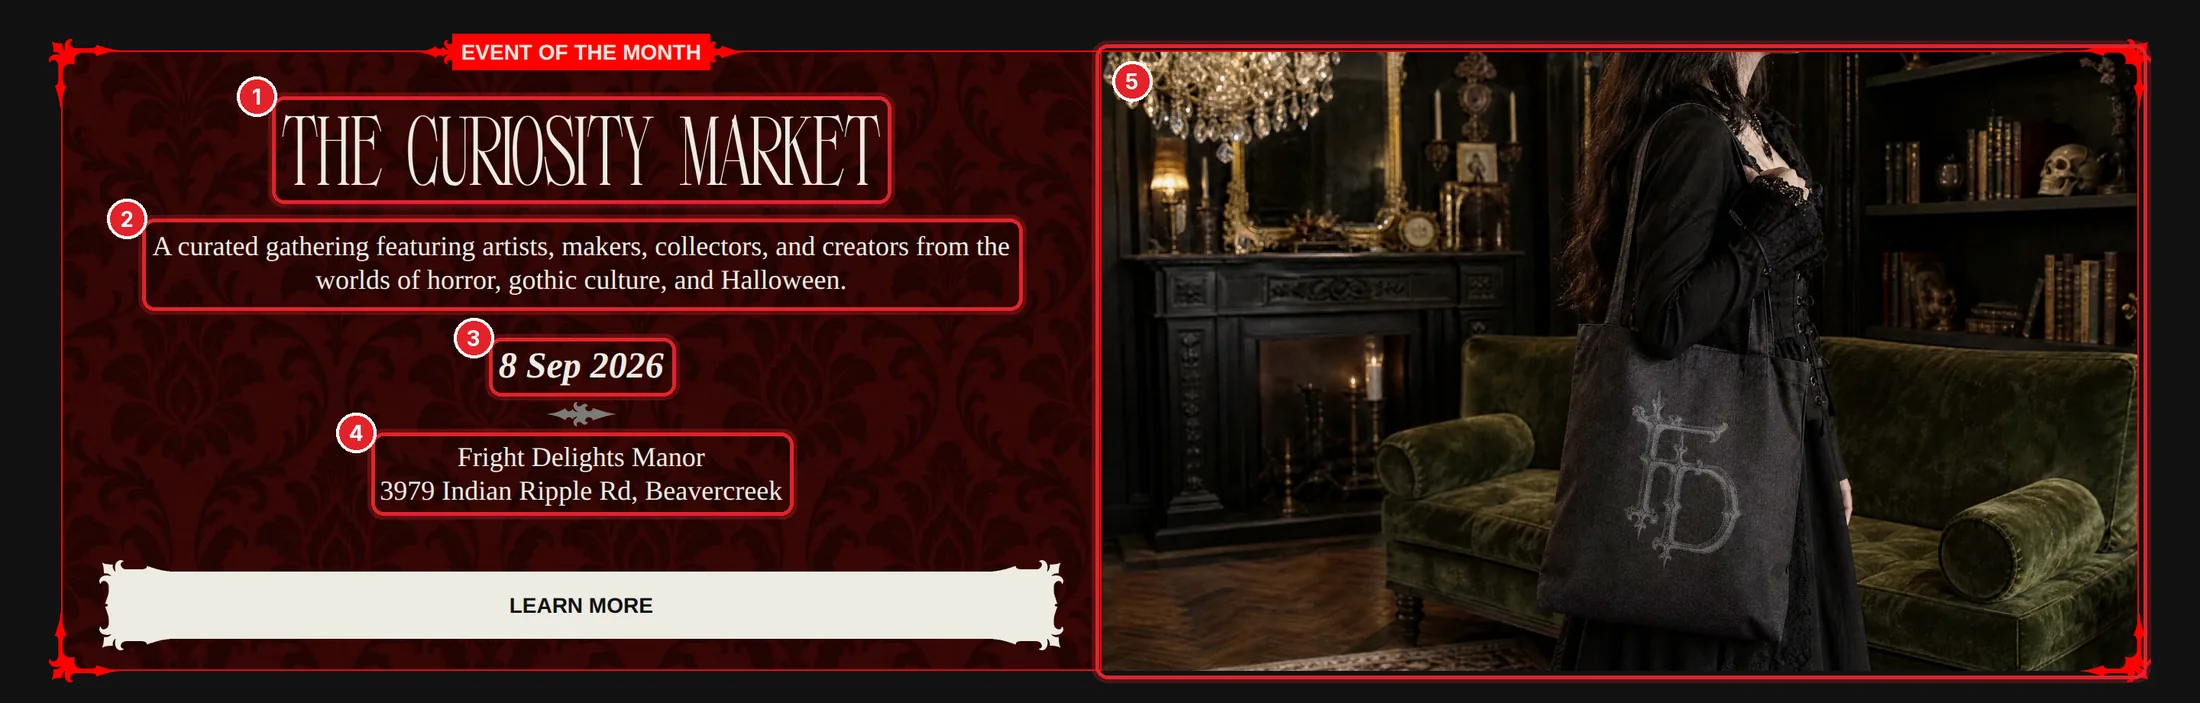
  1. 1Event name
  2. 2Excerpt
  3. 3Event date
  4. 4Event address
  5. 5Photo
The Upcoming Events card on the site with its parts numbered
The card on the Events page
3.6

The strip at the top of every page

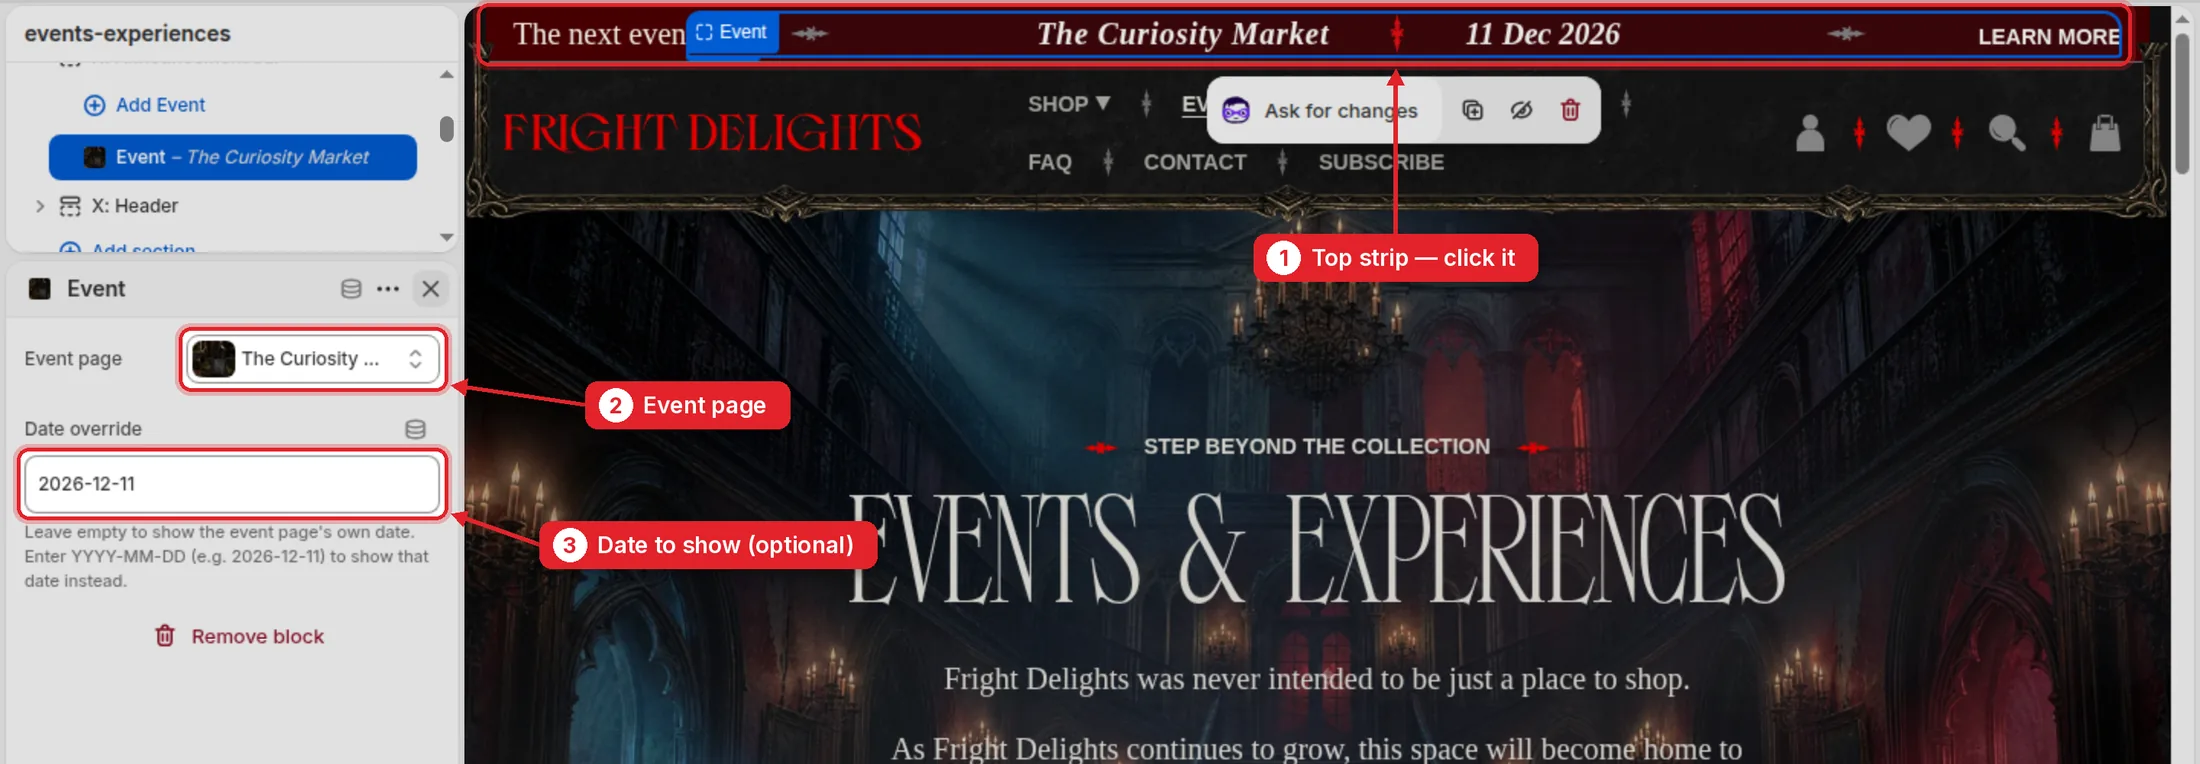
  1. 1In the theme editor click the strip on the page (it belongs to the Header).
  2. 2Event page: the event the strip announces; LEARN MORE opens it.
  3. 3Date override: optional. Type the date as 2026-12-11; leave it empty to show the event’s own date.
The top strip selected in the theme editor with Event page and Date override highlighted

Part 4

Write a journal post

The Journal is the blog called News. New posts appear on the Journal page and in the “Fright Delights’ Journal” blocks across the site.
4.1

Start a post

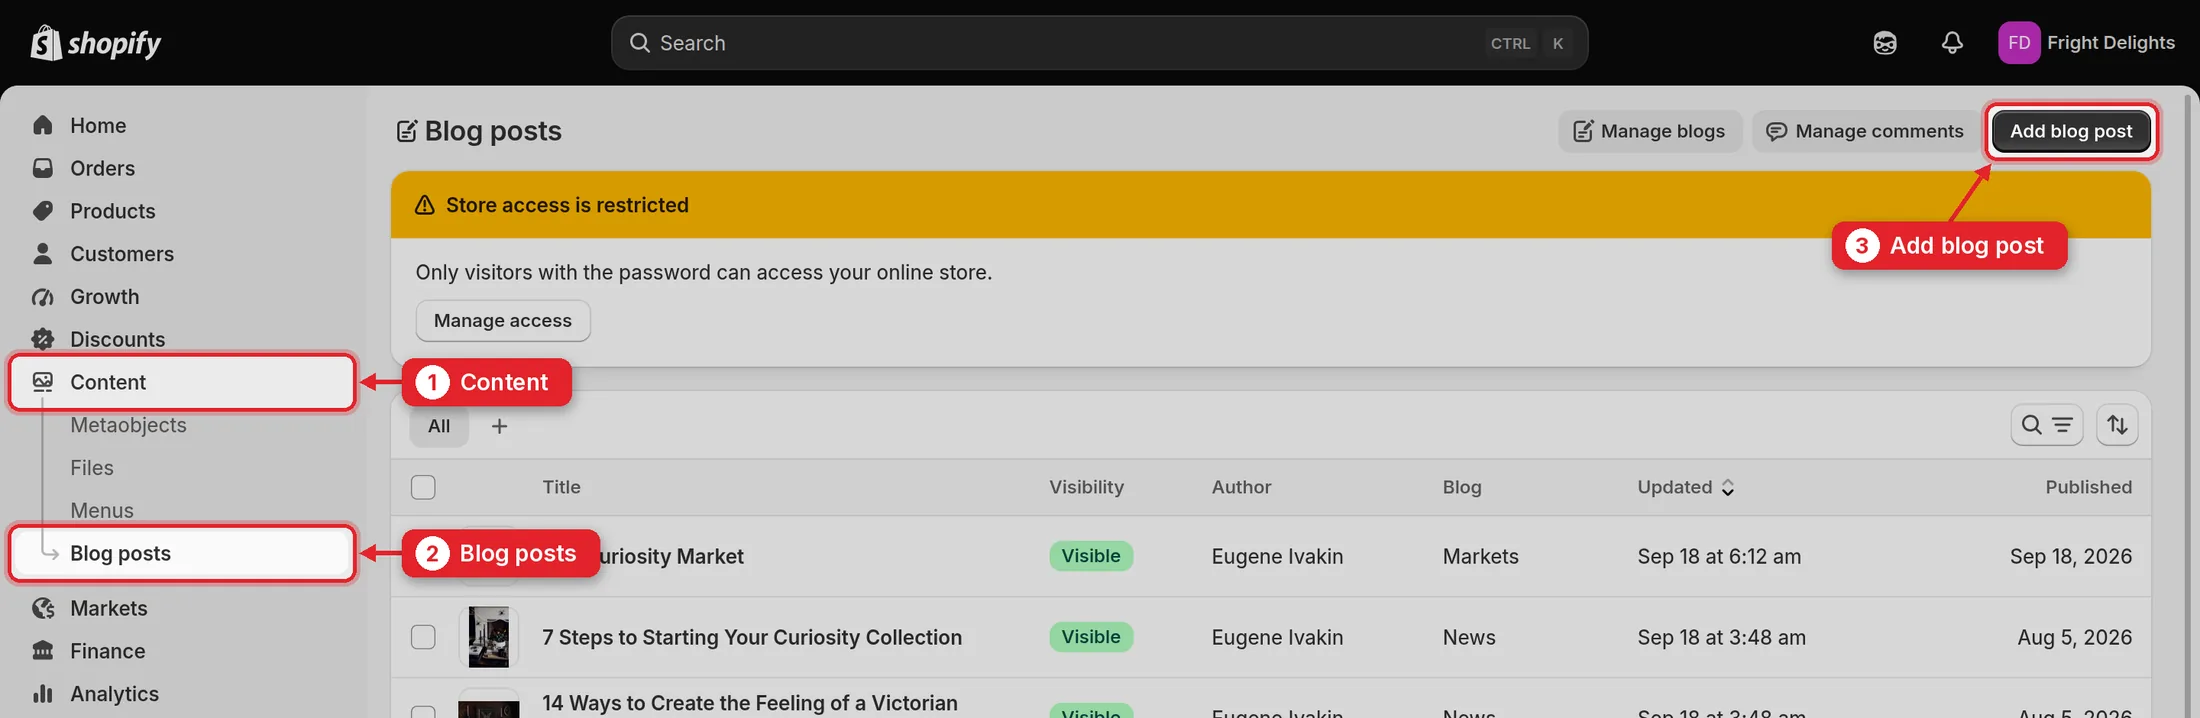
  1. 1Open Content.
  2. 2Open Blog posts.
  3. 3Click Add blog post.
Blog posts list with Content, Blog posts and Add blog post highlighted
4.2

Fill in the post

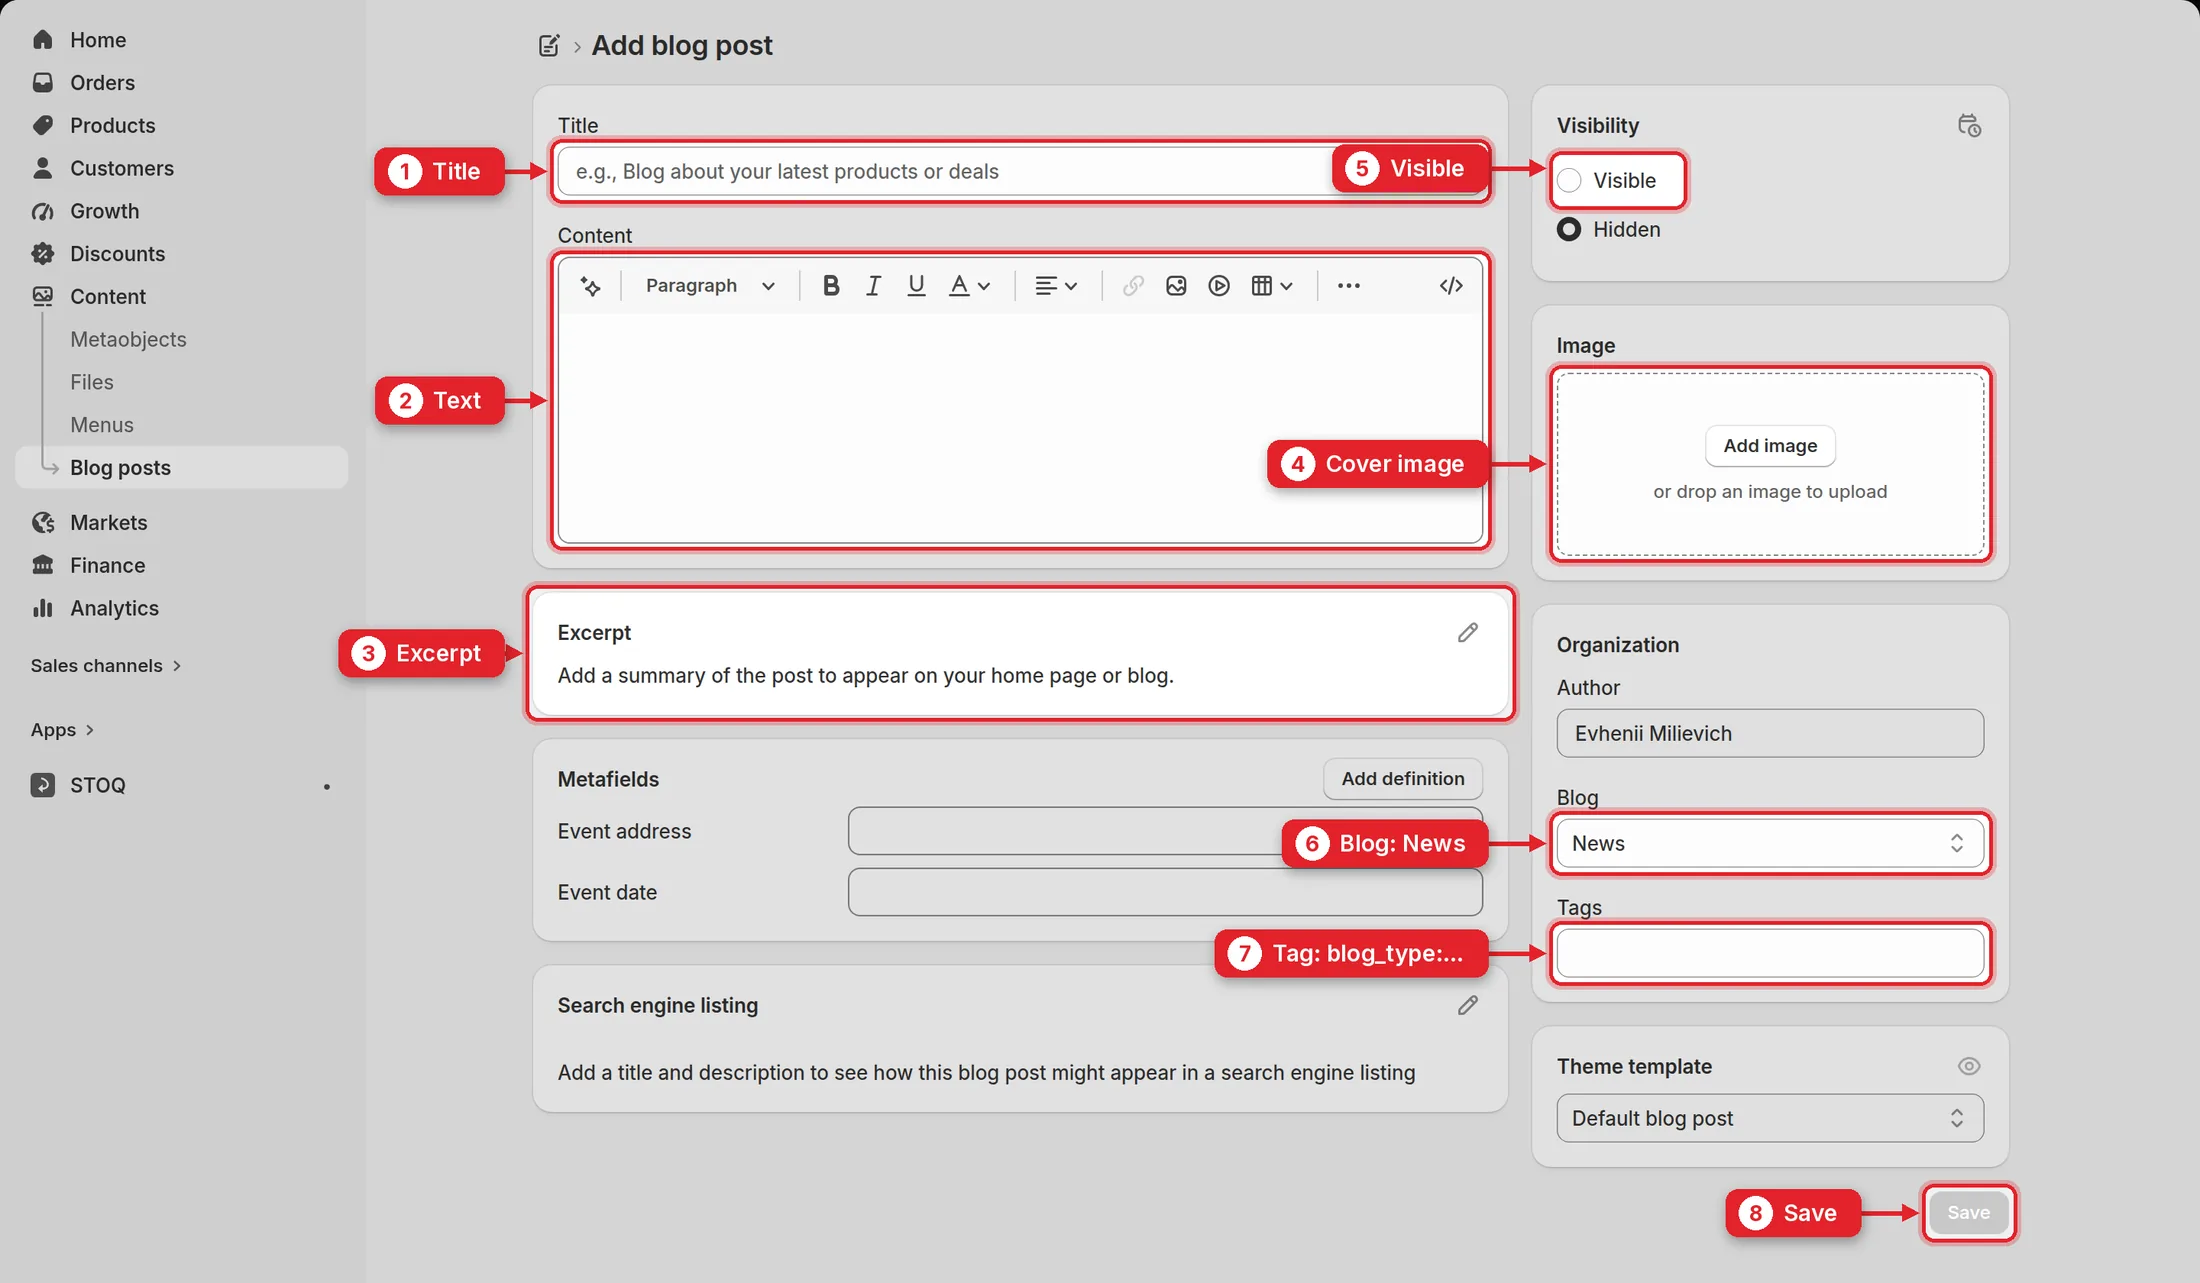
  1. 1Title.
  2. 2Text of the post. Pictures go in with the image button of the toolbar.
  3. 3Excerpt: optional, a 1–2 sentence summary for search results.
  4. 4Cover image: the picture on the journal card and at the top of the post.
  5. 5Visible publishes the post. Hidden keeps it as a draft; the calendar icon schedules a date.
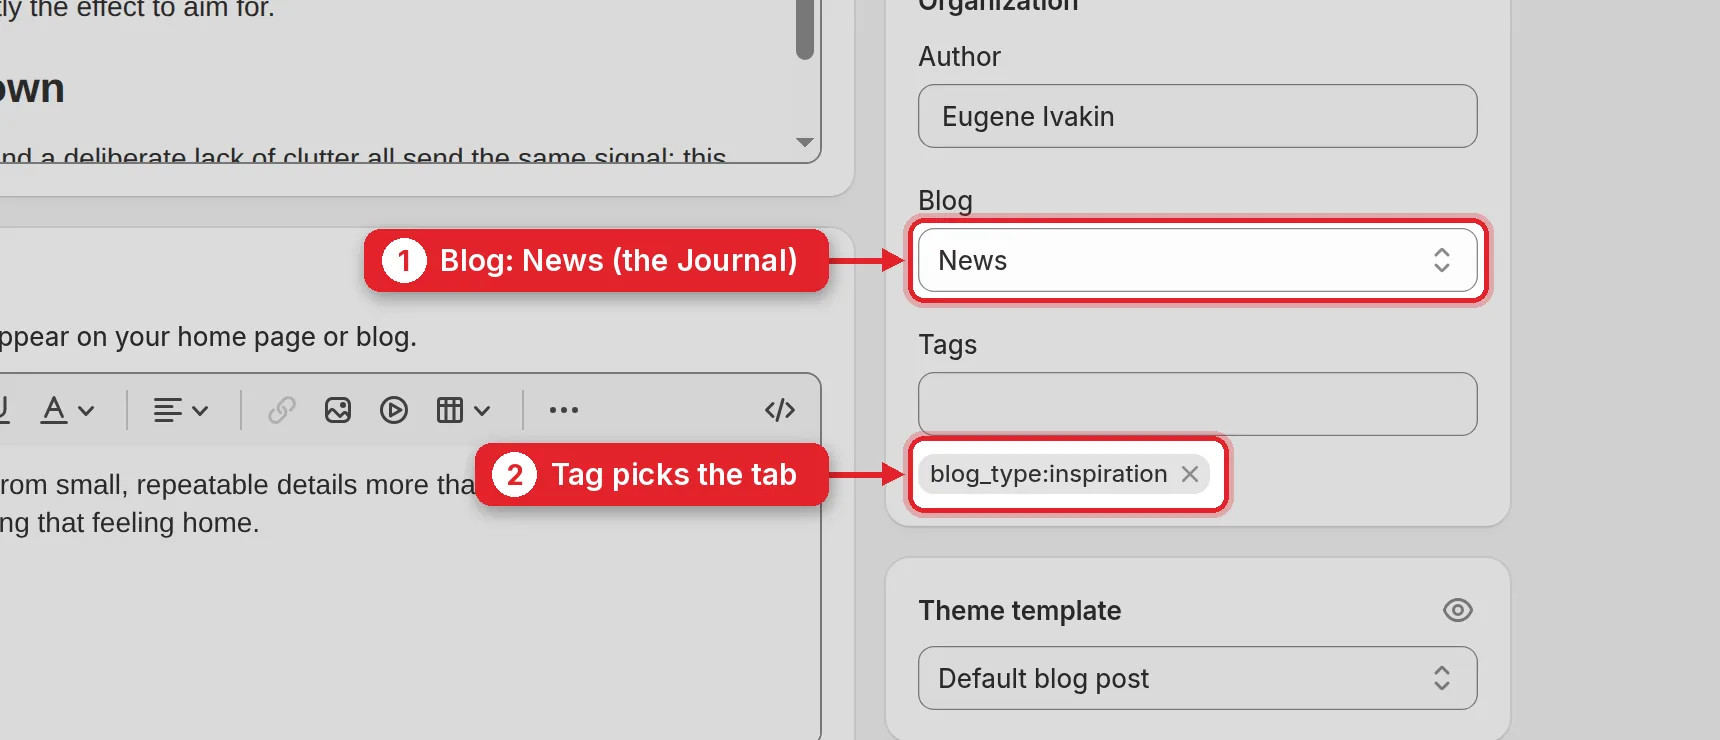
  6. 6Blog: keep News, that is the Journal.
  7. 7Tag: exactly one of blog_type:articles blog_type:guide blog_type:inspiration
  8. 8Save.
New blog post form with title, text, excerpt, cover image, visibility, blog, tags and Save highlighted
4.3

Chapters and the table of contents

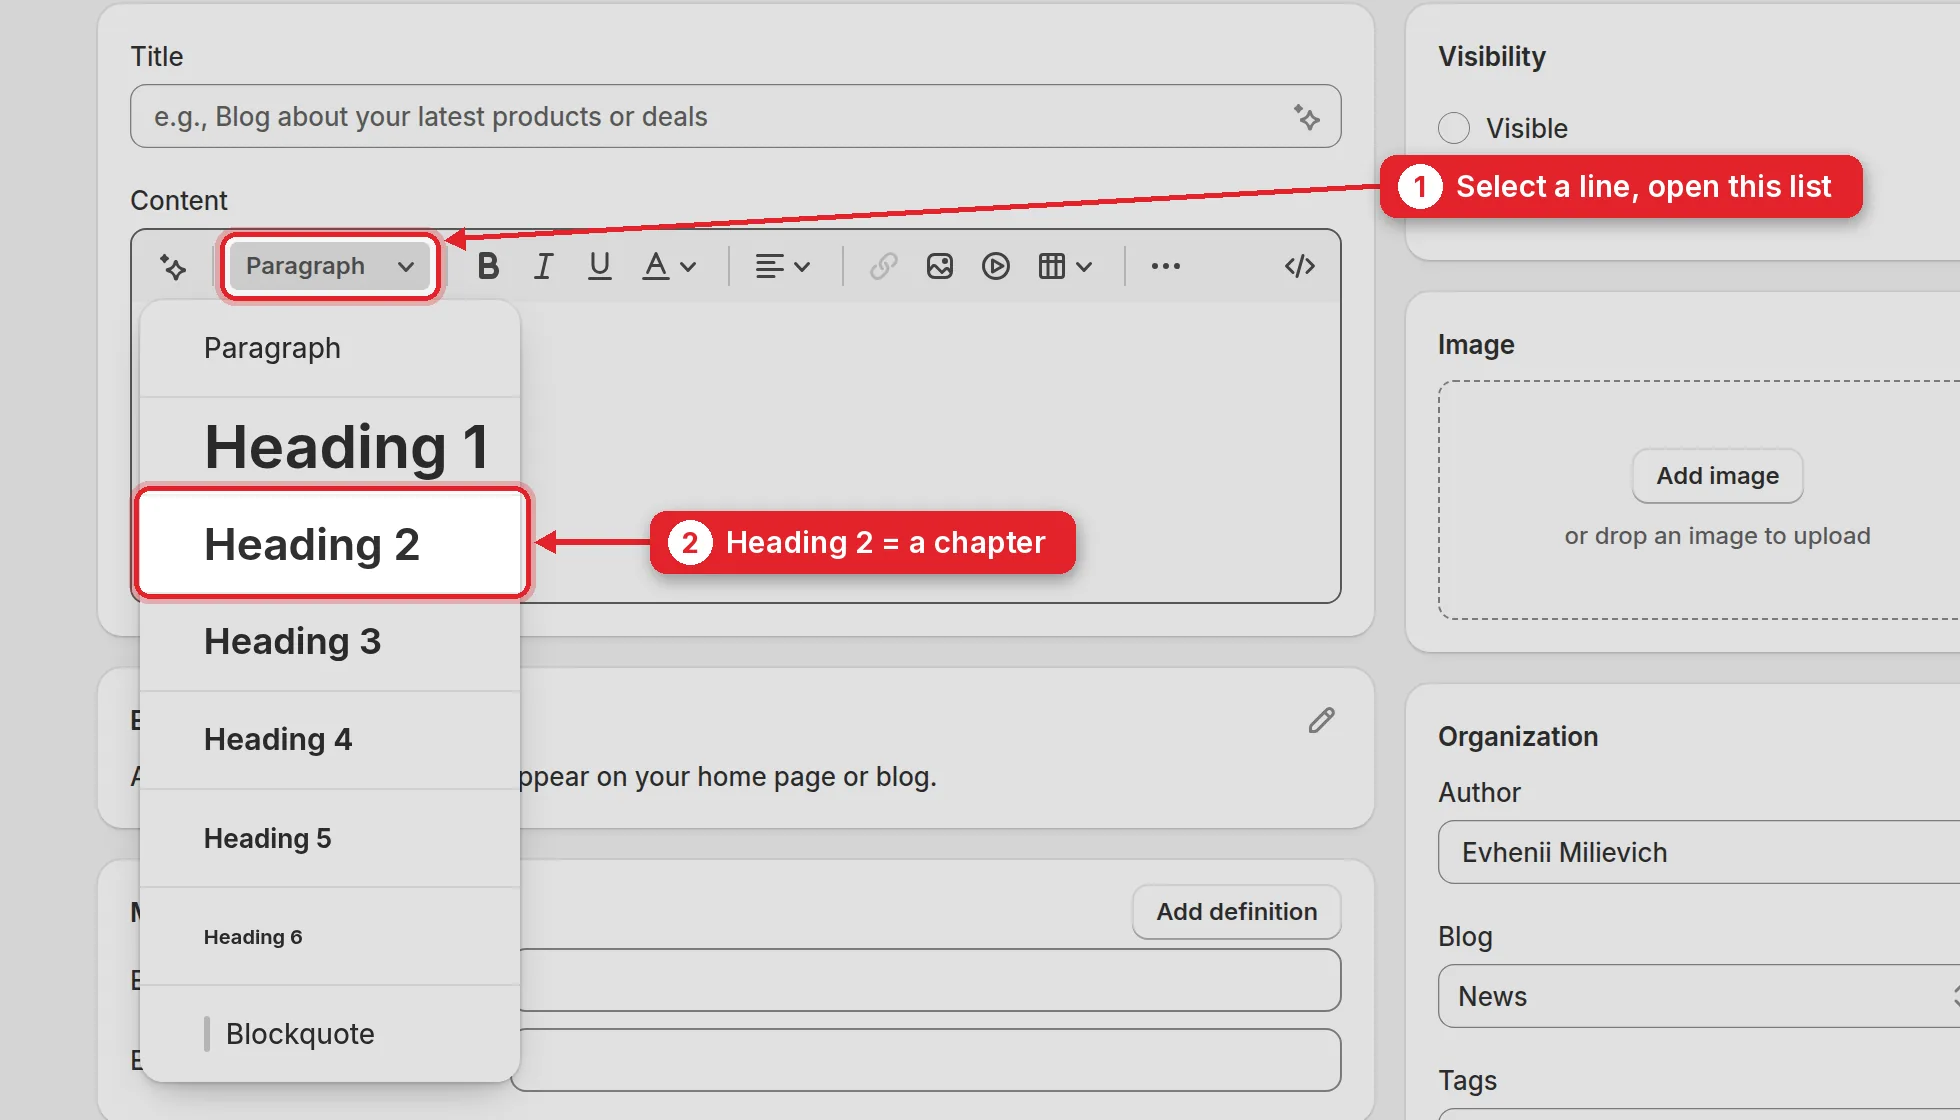
  1. 1Put the cursor on a line and open this list.
  2. 2Choose Heading 2. Every Heading 2 becomes a chapter and a link in the post’s table of contents.
The text format list opened with Heading 2 highlighted
4.4

The tag decides the tab

  1. 1The blog is News, the Journal.
  2. 2The tag, here blog_type:inspiration.
An existing post with the blog News and the tag blog_type:inspiration highlighted
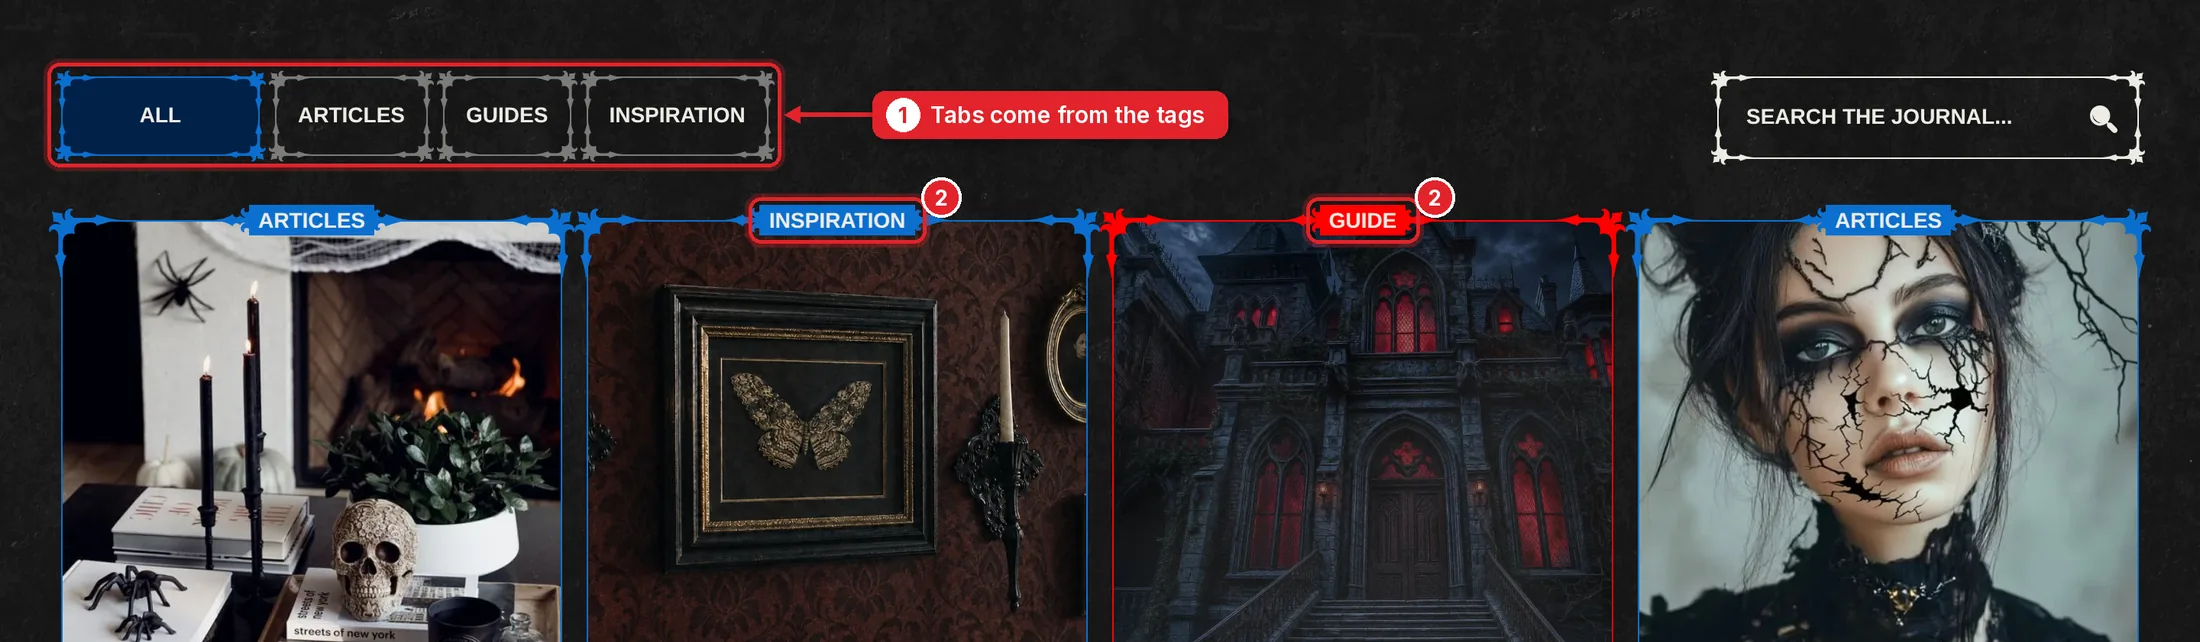
  1. 1The Journal tabs come from the tags: blog_type:articles → Articles, blog_type:guide → Guides, blog_type:inspiration → Inspiration.
  2. 2The same word is printed on the card.
The Journal page with the tabs and the card labels numbered
The Journal page